
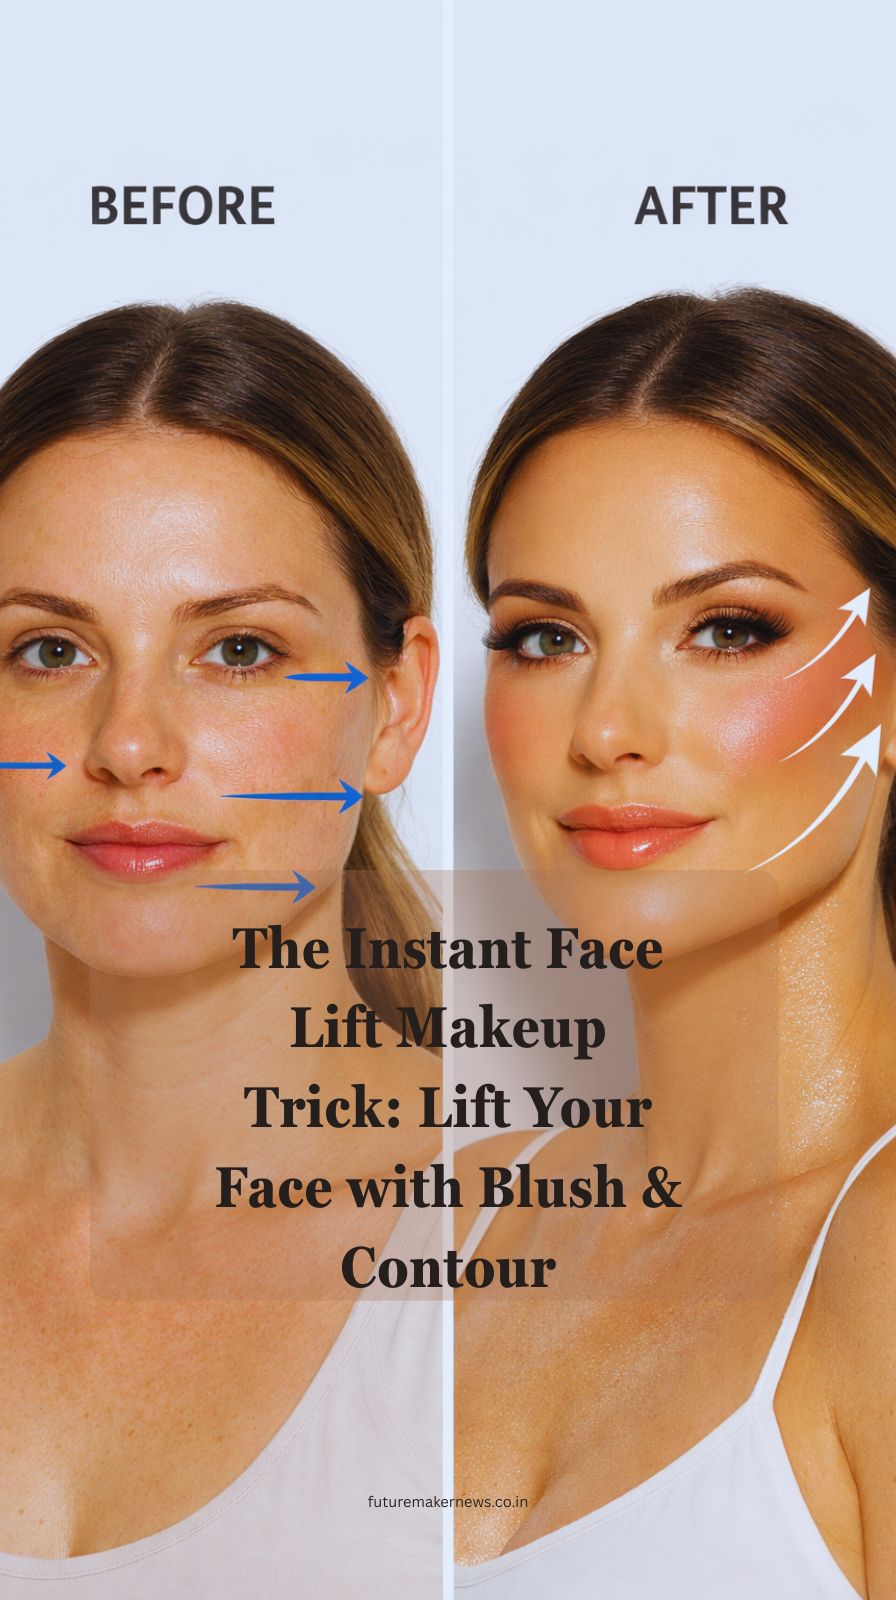
We have all been there—staring into the mirror after a long night, wishing we could just “pull” our features upward. While skincare is a long game, makeup artistry offers an immediate solution. You don’t need a surgical thread lift or expensive fillers to achieve a snatched, youthful look.
The secret lies in optical illusions. By mastering strategic blush placement and precise contour angles, you can effectively “remodel” your face shape in under five minutes. This is about working with light and shadow to defy gravity.
1. The Physics of the “Lift”
Before picking up a brush, you must understand the “Upward Diagonal” rule. To look lifted, every line you draw on your face—from your eyeliner to your bronzer—should follow a parallel line pointing toward the top of your ears.
- Gravity Defiance: As we age, the face naturally loses volume, causing features to migrate downward. Makeup can counteract this by creating visual height.
- The Power of Angle: Horizontal lines widen the face; vertical lines lengthen it; but diagonal lines lift it.
- Symmetry is Secondary: While we strive for balance, focusing on the upward trajectory is more important for the lifting effect than perfect 1:1 symmetry.
- Texture Matters: For a natural lift, cream products are superior to powders. They melt into the skin, mimicking the look of natural muscle and fat distribution.
- The “Shadow” Rule: Contour is meant to mimic a shadow. Shadows fall under structures. To lift, we move these shadows slightly higher than where they naturally occur.
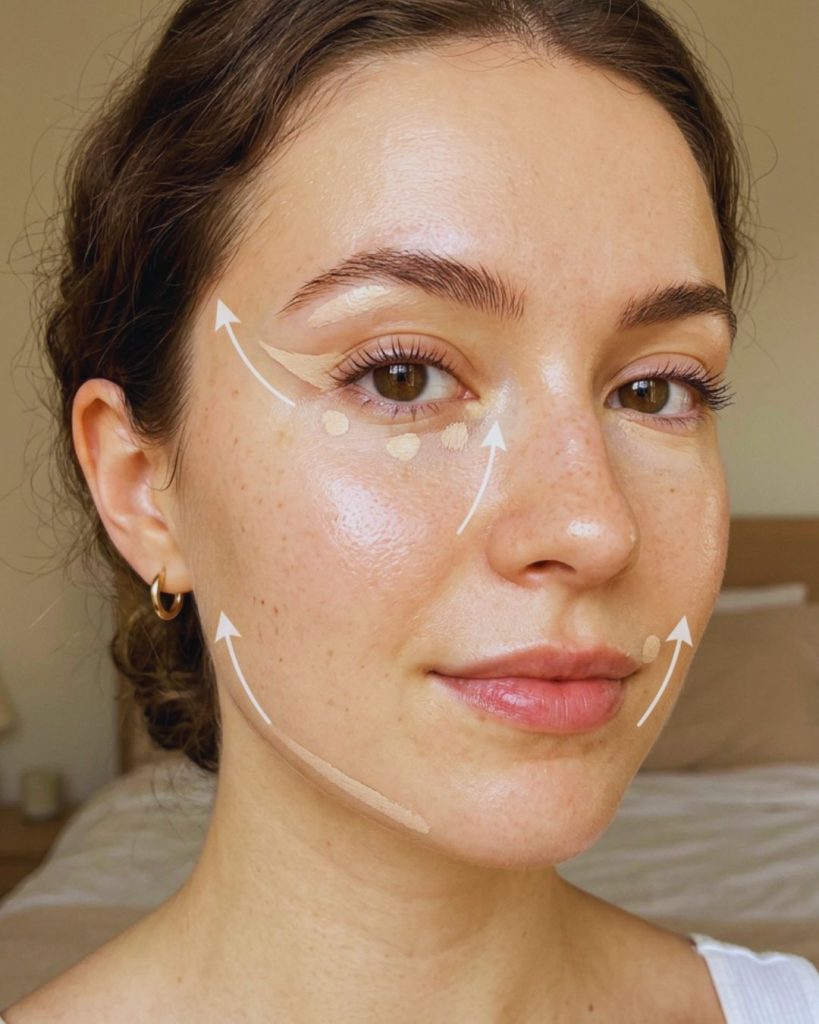
2. High-Altitude Blush Placement
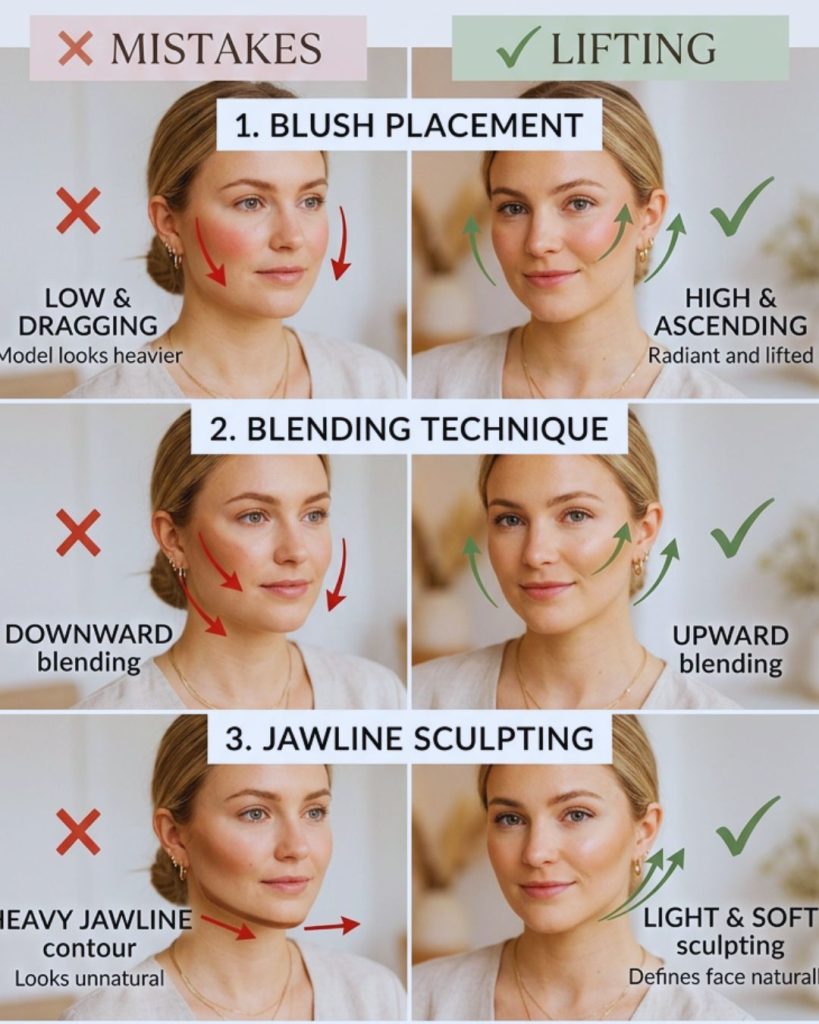
Forget the old-school advice of “smiling and applying blush to the apples of your cheeks.” For most face shapes, that technique actually pulls the face down once you stop smiling.
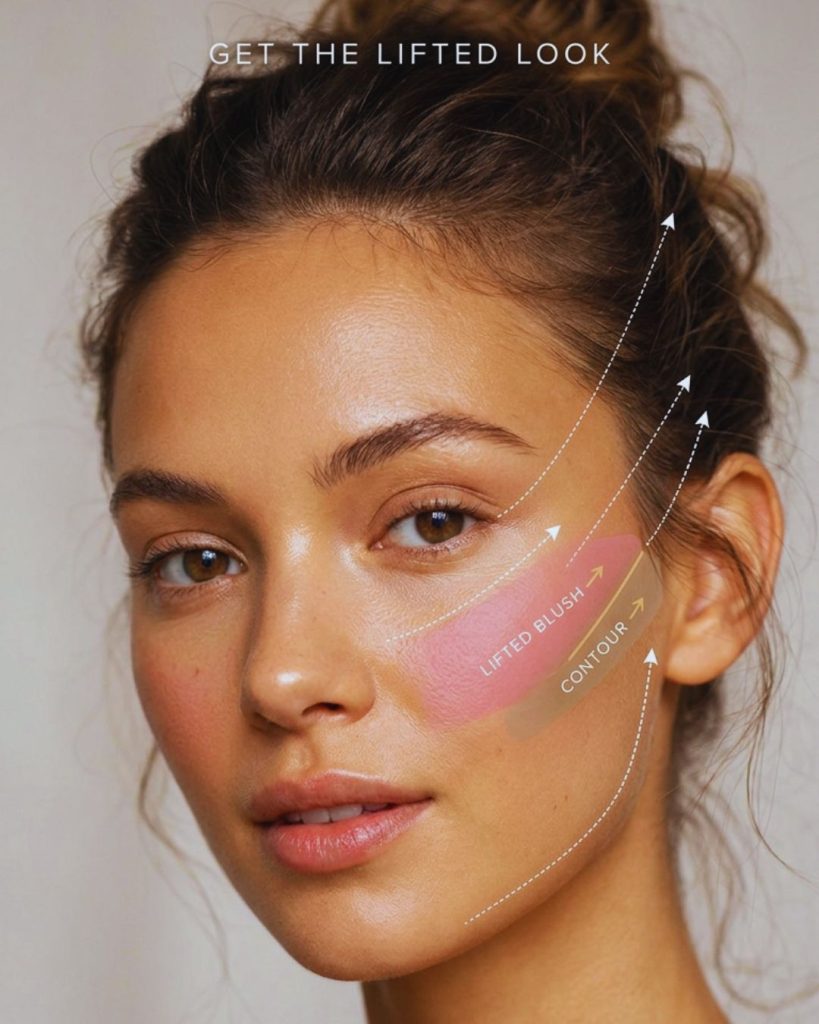
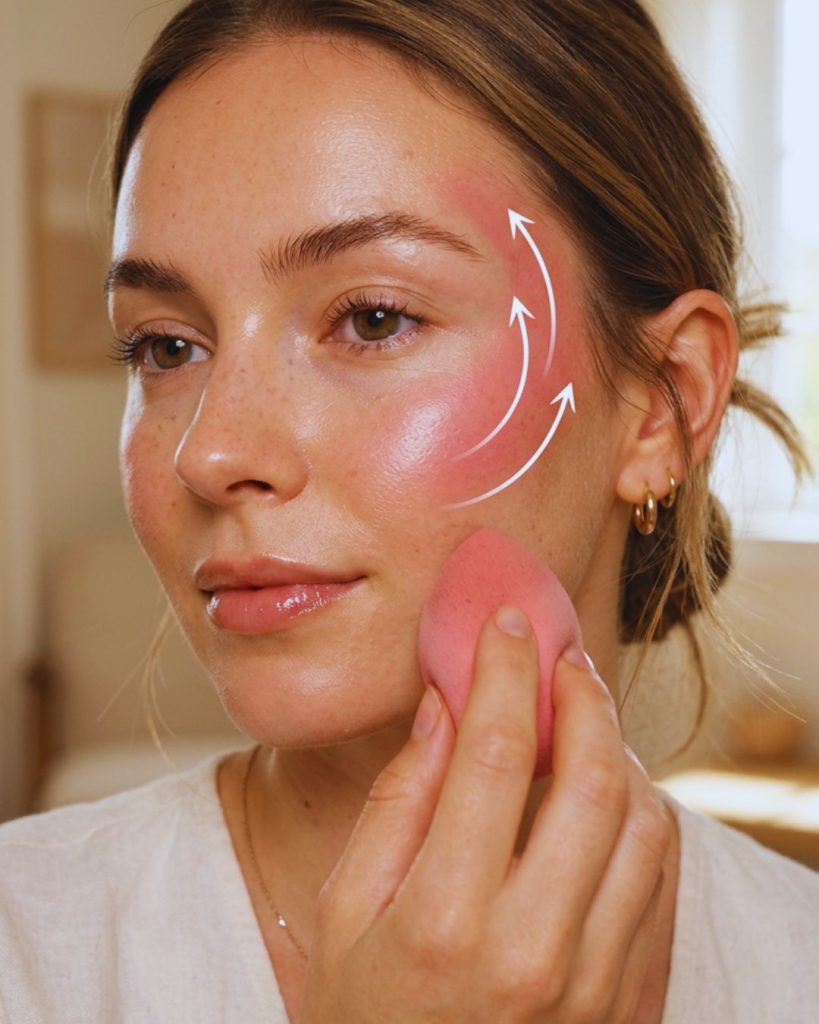
- The Temple Trick: Apply your blush starting at the high point of your cheekbone and blend it upward into your hairline and temples. This creates a “C” shape that draws the eye upward.
- Avoiding the Nose: Keep your blush at least two fingers’ width away from your nose. Applying color too close to the center of the face adds “weight” and can make you look tired.
- The Lifted Apple: If you love color on the front of your face, place it on the upper outer quadrant of the cheek apple, never the bottom.
- Color Selection: Use warm, brightening tones like peach or soft rose. These colors mimic blood flow and vitality, which are hallmarks of a youthful, lifted complexion.
- Seamless Blending: Use a damp beauty sponge to press the blush into your concealer. There should be no visible line where the color begins—just a seamless transition of “glow.”
3. Precision Contour Angles: The “Snatched” Secret
Contouring isn’t about “striping” your face; it’s about redefining the bone structure. To achieve an instant lift, we focus on the “hollows” but place them higher than you think.
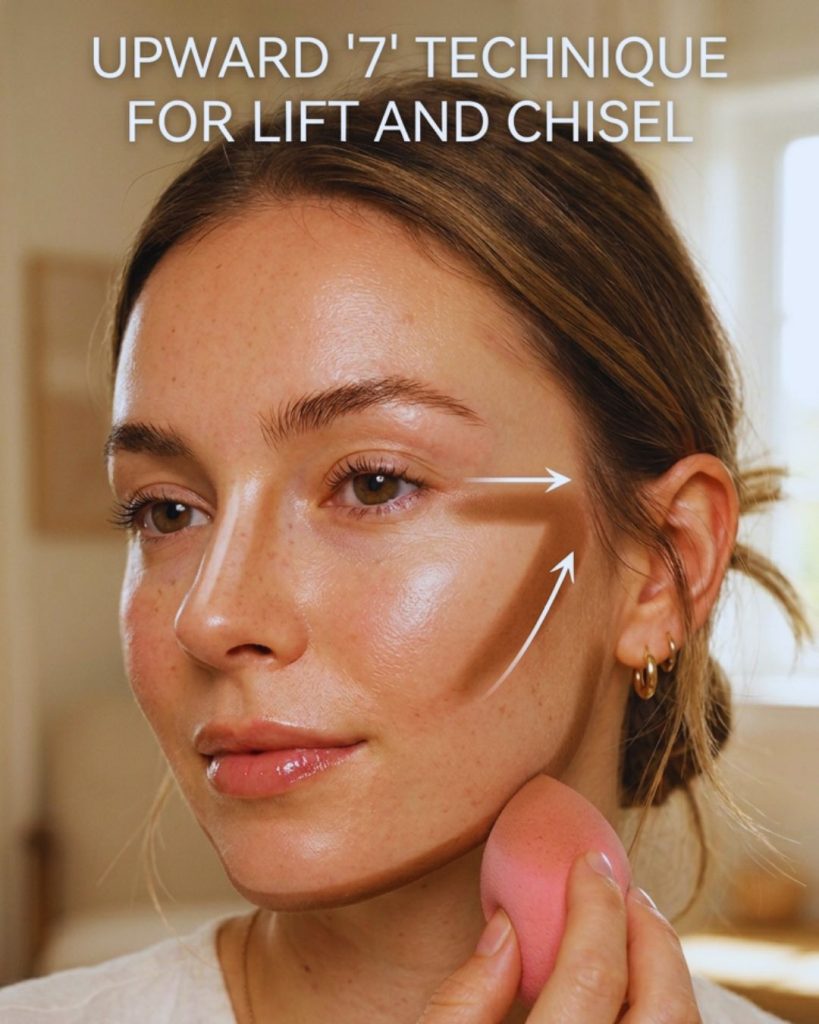
- The Cheekbone Elevation: Find your natural cheekbone hollow. Now, apply your contour cream slightly above that line. By darkening the area just above the hollow, you create the illusion that your bone sits higher.
- The Jawline Refiner: Instead of drawing a line under your jaw, draw it slightly on the edge of the jawbone and blend downward toward the neck. This creates a sharper silhouette.
- The “3” Technique Revised: Many tutorials suggest a “3” shape (temple, cheek, jaw). For a lift, make this “3” more of a “7” shape, focusing heavily on the upward flick at the end of the cheekbone.
- The Eye Socket Lift: Take a tiny bit of your contour shade and blend it into the outer crease of your eye, extending it toward the tail of your brow. This opens up the eyes and lifts the brow bone.
- Nose Sculpting for Height: A thin line of highlighter down the very center of the nose, stopping before the tip, creates a “button” effect that pulls the center of the face upward.
4. The Concealer “Eraser” Method
Concealer isn’t just for hiding dark circles; it is a powerful highlighting tool that cleans up your angles and reinforces the lift.
- The Outer Eye Flick: Apply a small amount of brightening concealer at the outer corner of your eye, angling it upward toward your temple. Blend this out to “erase” any downward-sloping shadows.
- The Mouth Corner Lift: As we age, the corners of the mouth can shadow downward. A tiny dot of concealer blended upward at the corners of the lips creates an instant “mini-lift.”
- The Under-Contour Clean-Up: After applying your cheek contour, run a line of concealer directly underneath it. This sharpens the “shadow” and makes the lift look intentional and professional.
- The Brow Tail Highlight: A touch of matte highlighter directly under the tail of the eyebrow “pops” the brow bone, making you look more awake.
- Setting for Longevity: Use a translucent setting powder only on the areas where you applied concealer to lock those “uplifted” points in place all day.
5. Essential Tools for the Lifting Effect
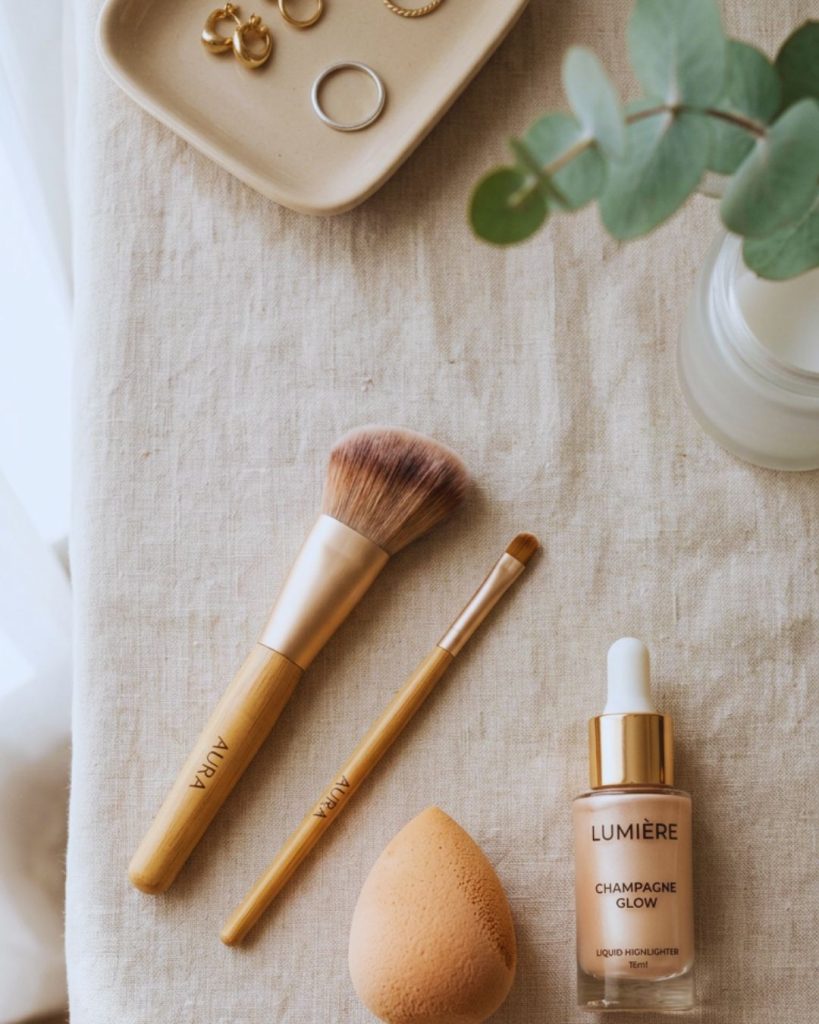
You can have the best technique in the world, but the wrong tools will muddy the results.
- Angled Brushes: Use an angled blush brush to naturally follow the slant of your cheekbones. The shape does half the work for you.
- Small Detail Brushes: For the “eraser” method, use a small, flat synthetic brush. This allows for the surgical precision needed to create sharp, lifted lines.
- The Beauty Sponge: Always finish by bouncing a damp sponge over your work. This removes excess product and ensures the contour angles look like skin, not paint.
- Reflective Highlighters: Use a liquid highlighter on the highest points of the face (tops of cheekbones, brow bone). Light-reflecting particles draw the observer’s eye to the “high” points you’ve created.
6. Common Mistakes That “Drop” Your Face
To look lifted, you must avoid these common pitfalls that add visual weight to the lower half of the face.
- Too Much Product on the Jaw: Heavy makeup on the jawline emphasizes sagging skin. Keep the lower face as light and “skin-like” as possible.
- Circular Blending: Avoid buffing your products in circles. Always use upward, sweeping motions.
- Dragging Down the Eyeshadow: Never let your eyeshadow dip below the level of your lower lash line. This creates a “droopy” eye effect.
- Low-Hanging Bronzer: Bronzer should be a “sun-kissed” glow on the high points, not a muddy mask. Keep it on the perimeter of the face.
- Over-lining the Bottom Lip: Focus your lip liner on the cupid’s bow to pull the attention upward, rather than emphasizing the heavy part of the lower lip.
7. The Final Polish: Hair and Brows
Your makeup lift is completed by how you frame your face with your hair and brows.
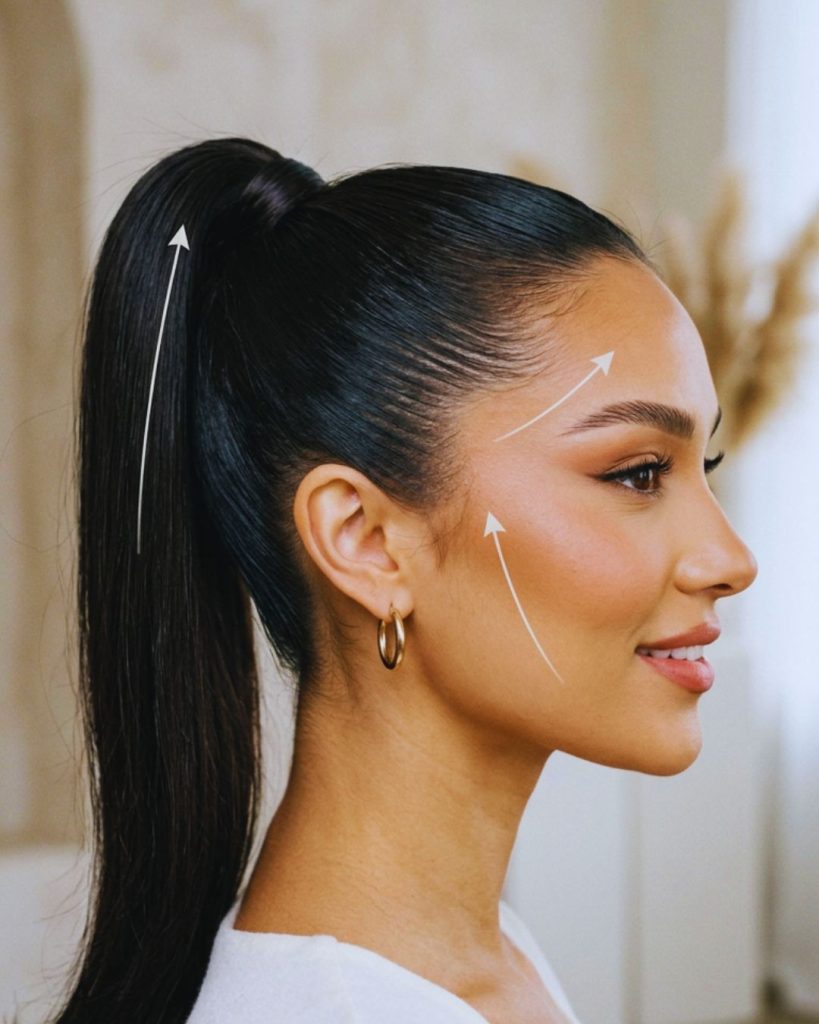
- The Straight Brow: A slightly straighter brow with a tail that points toward the top of the ear (rather than curving down) provides an instant temple lift.
- The High Ponytail: If you really want to emphasize your makeup work, a sleek, high hairstyle physically pulls the skin of the face back, amplifying your contouring.
- Volume at the Crown: Adding height to the hair at the top of the head elongates the face and supports the upward diagonal of your makeup.
Comparison Table: Traditional vs. Lifting Technique
| Feature | Traditional Method | The Instant Lift Method |
| Blush | Apples of the cheeks | High cheekbones & Temples |
| Contour | In the hollows | Slightly above the hollows |
| Concealer | Triangle under eyes | Upward flicks at corners |
| Blending | Circular motions | Upward diagonal sweeps |
| Finish | Matte & Flat | Dewy & Reflective |
Conclusion
The “Instant Face Lift” through makeup is a game of strategic placement and light manipulation. By shifting your blush placement higher and perfecting your contour angles, you can transform a tired complexion into a snatched, youthful masterpiece. Remember: in the world of beauty, everything must go up.