Collage of five women in urban street-style poses: walking, crossed legs, candid laughing, over-the-shoulder glance, and sitting on steps, wearing trendy outfits with city backdrops.

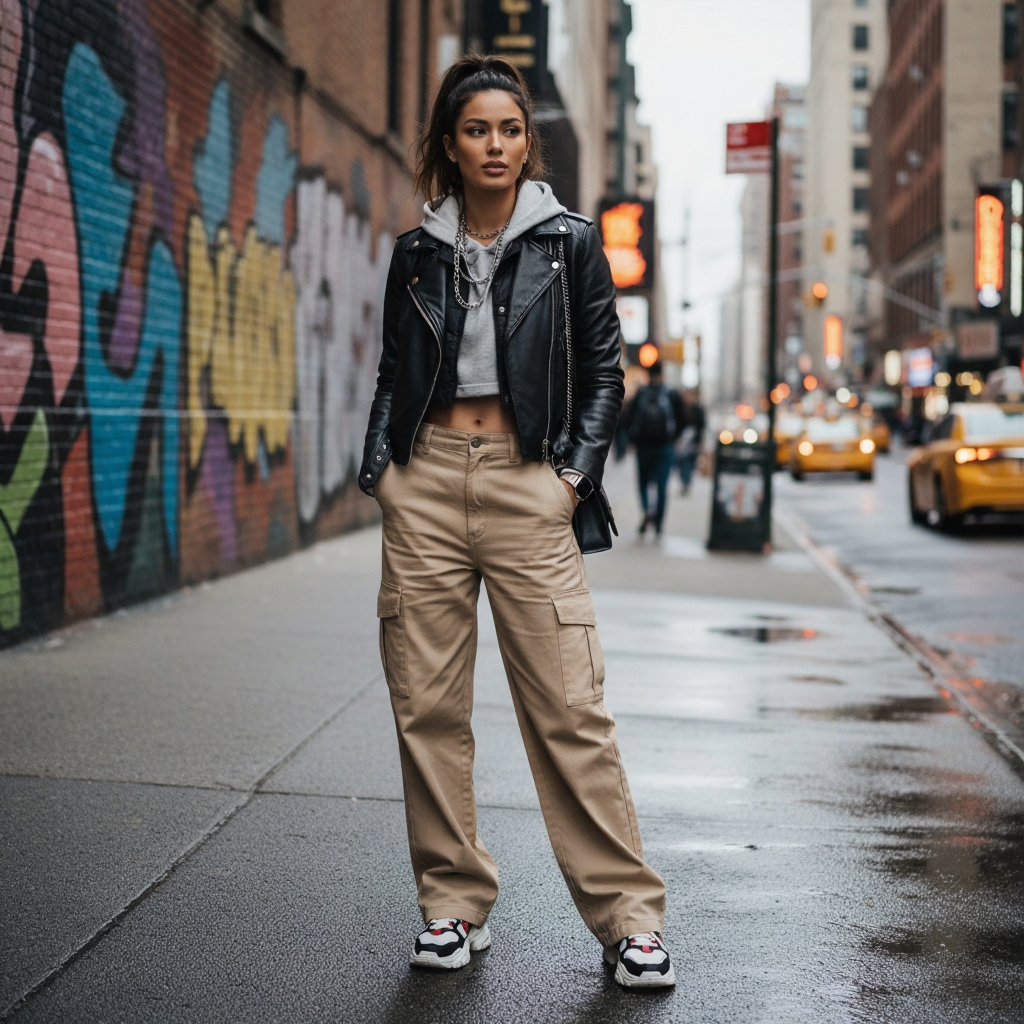
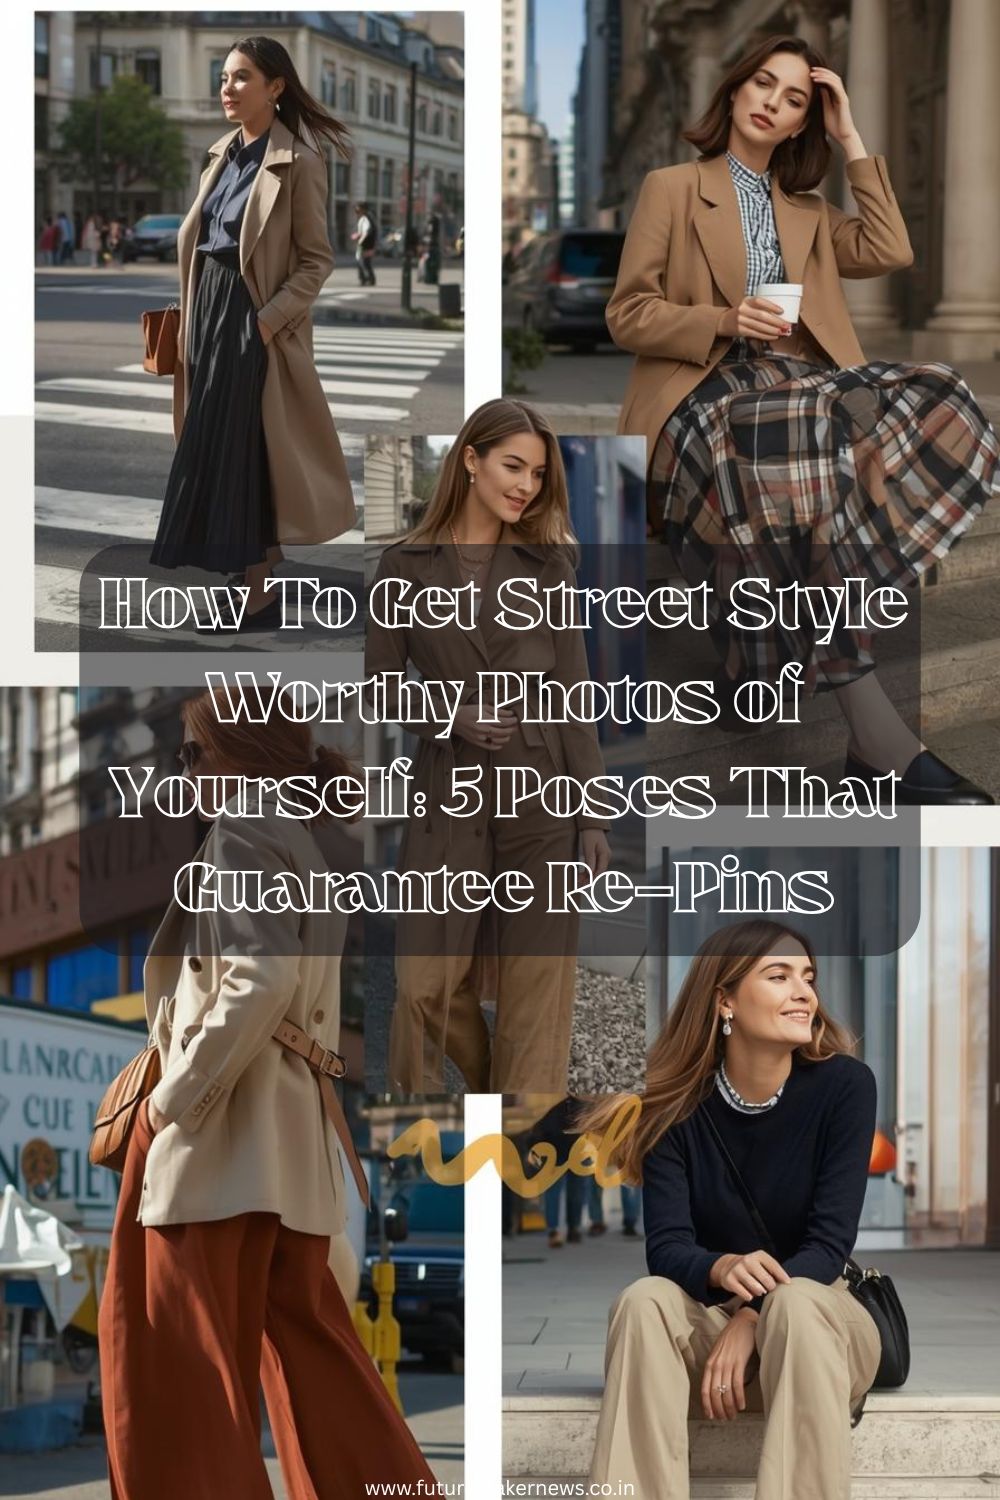
Have you ever scrolled through Pinterest or Instagram and wondered how some people look effortlessly stylish in their street photos? Their outfits pop, their poses feel natural, and somehow, every shot looks magazine-worthy.
Here’s the secret — it’s not just about the clothes, it’s about how you pose and how you present your vibe through the lens.

Whether you’re a fashion blogger, an influencer, or someone who simply loves capturing their best looks, mastering a few street-style poses can transform your photos from “nice” to absolutely scroll-stopping.

In this guide, you’ll discover five foolproof street-style poses that guarantee attention, likes, and yes — Pinterest re-pins. Each pose is designed to highlight your outfit, enhance your personality, and help you feel confident in front of the camera.

Let’s dive into the world of effortless street-style photography and learn how to get those street-style-worthy photos of yourself.

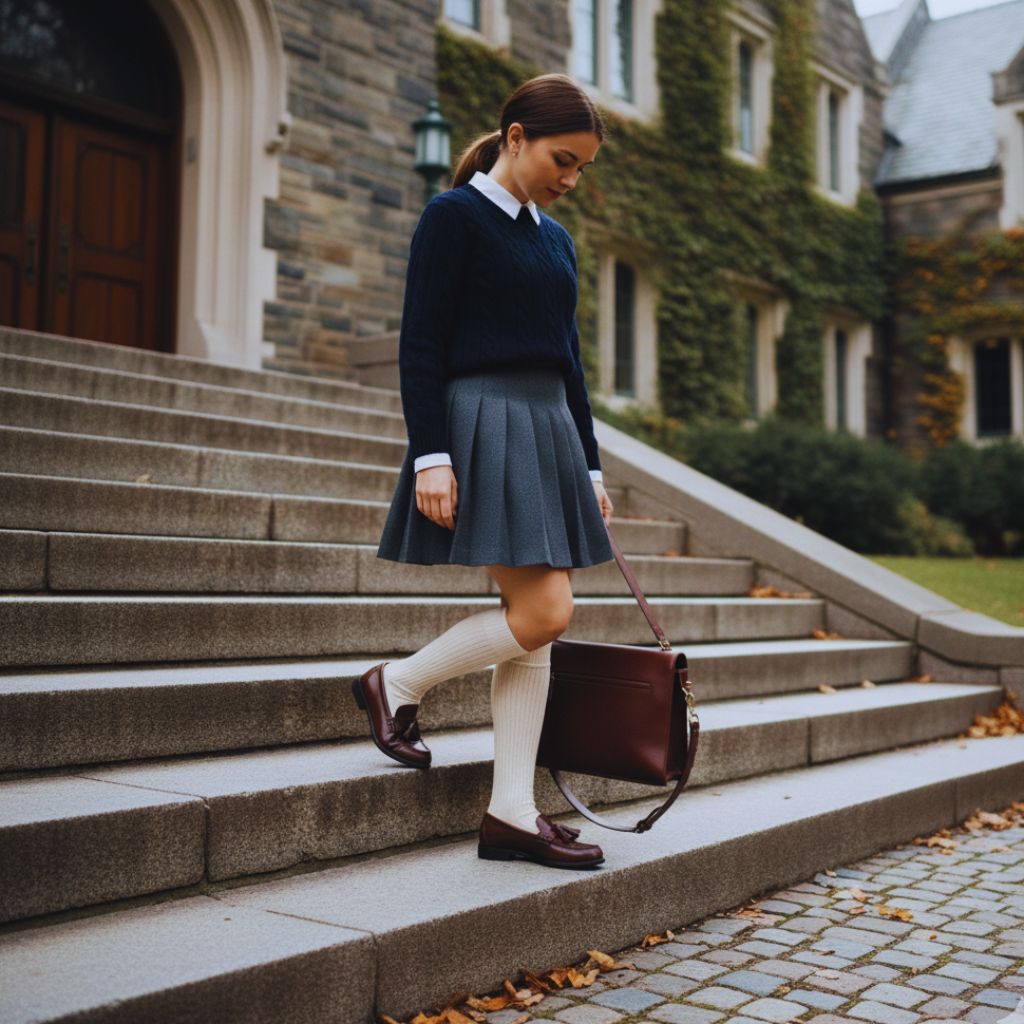
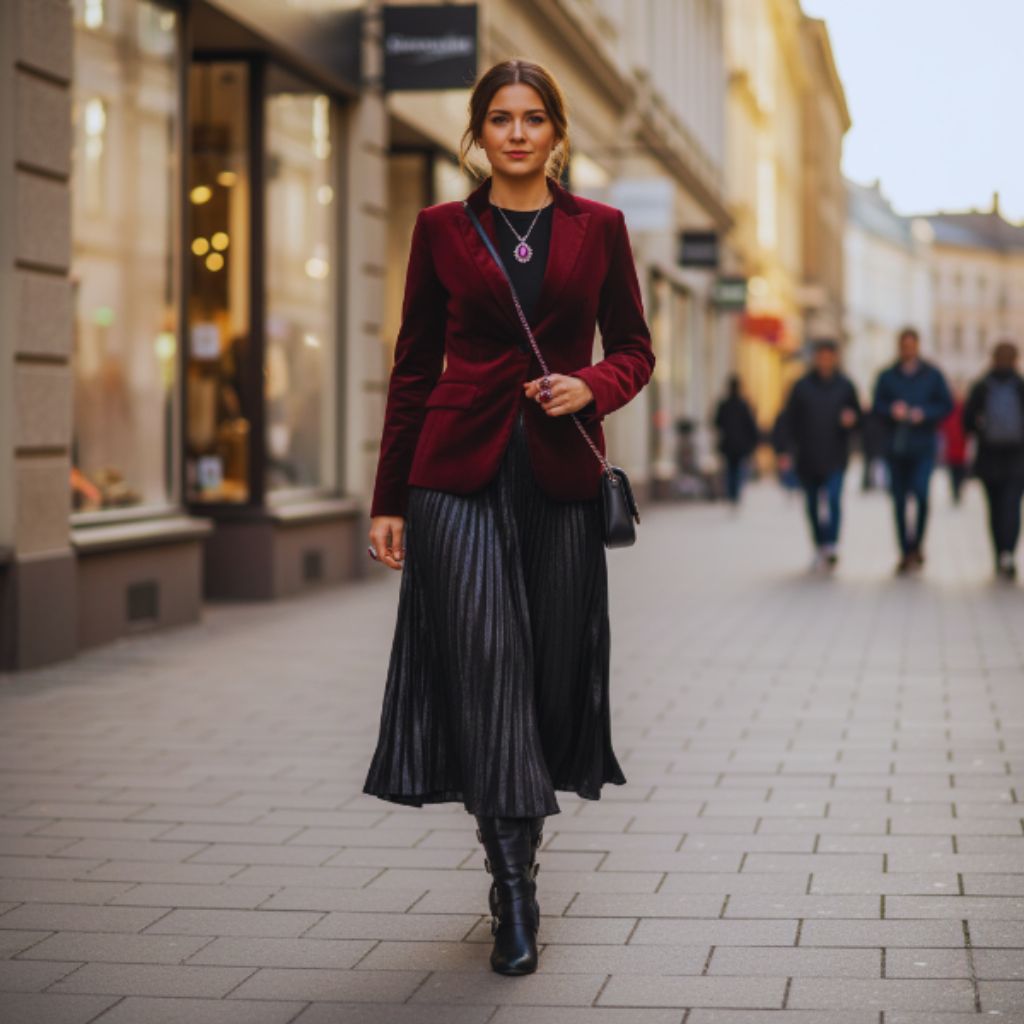
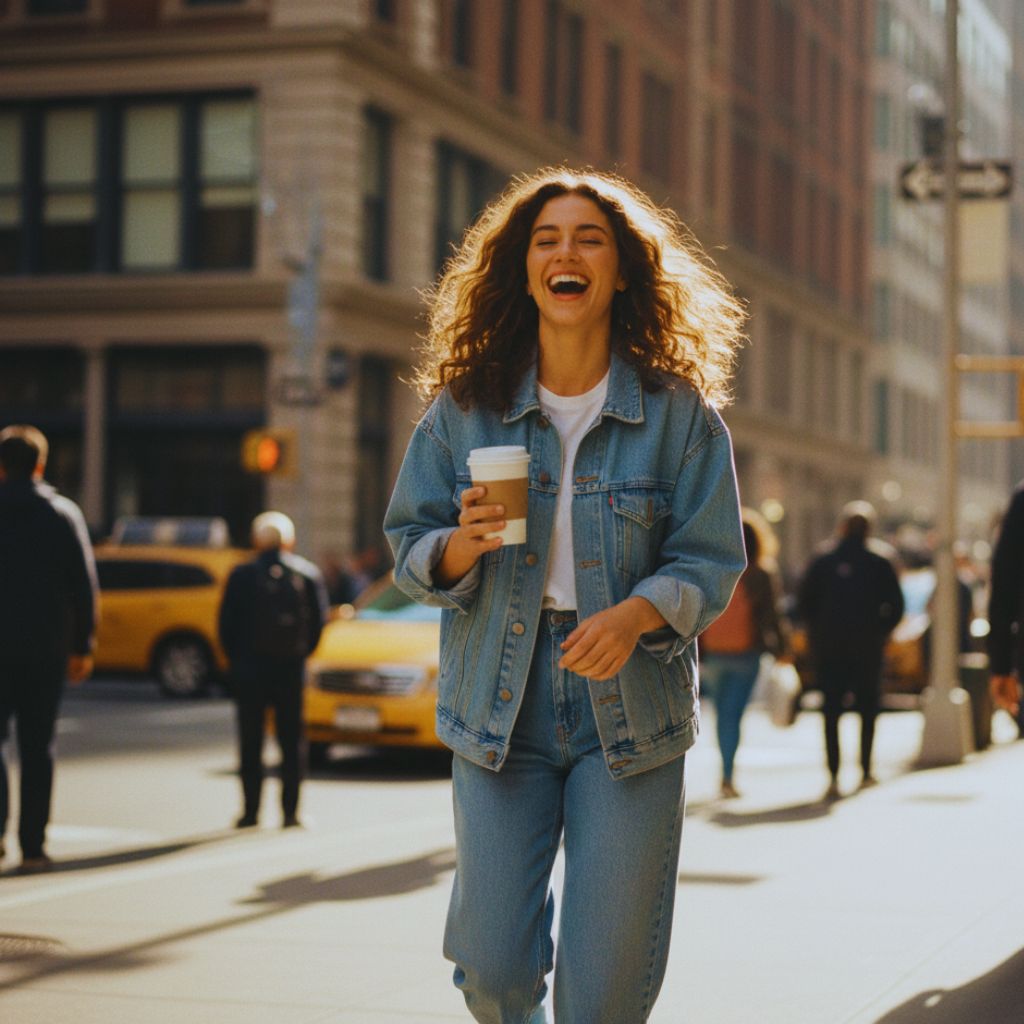
1. The Walking Shot – Effortless Movement, Maximum Style

Fashionable woman walking confidently on a city street, captured mid-step in a candid, stylish pose.
“Effortless motion, maximum impact — the walking shot is your street-style secret weapon.”

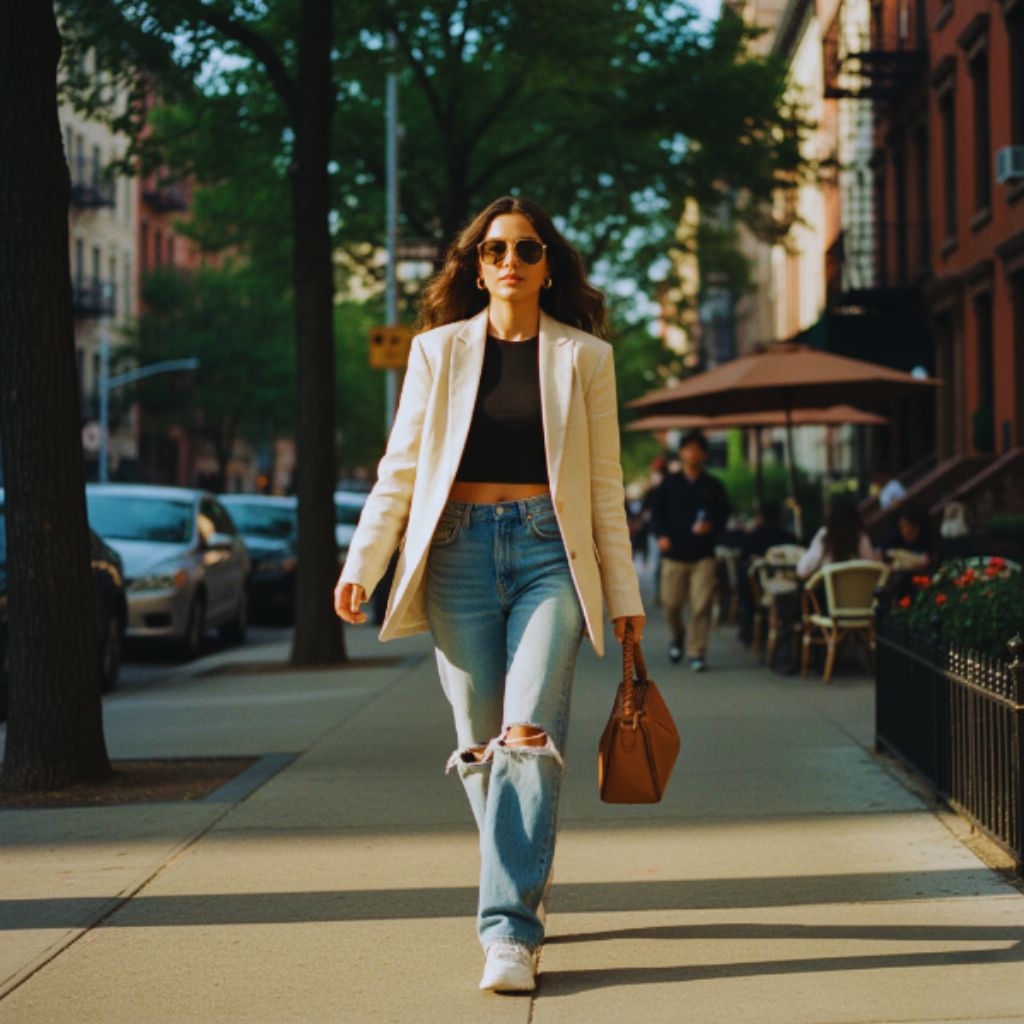
Nothing says “street style” like a photo that looks candid yet perfectly styled. The walking shot is a go-to for influencers and photographers because it captures motion, confidence, and a sense of realism.

How to Nail It:

  • Walk naturally — not too fast, not too stiff. Pretend you’re casually strolling through the city.
  • Keep your posture tall and shoulders relaxed.
  • Swing your bag or jacket slightly, so it adds dynamic movement to the shot.
  • Keep your eyes away from the camera, as if you’re lost in thought or heading somewhere exciting.

Pro Tip:

Shoot in burst mode (continuous shots). This way, you’ll have multiple frames to choose from, and you can pick the one where your stride, outfit, and background align perfectly.

Why It Works:

This pose adds life to your photo. It feels real, not staged. That’s why Pinterest users love it — it tells a story and inspires others to try the same look in real life.

2. The Crossed Legs Pose – Chic, Confident, and Camera-Ready

Fashion model posing on a city street with crossed legs, wearing a trench coat and sunglasses for a chic, elegant look.
“Cross, pose, conquer — the simplest stance that screams quiet confidence.”

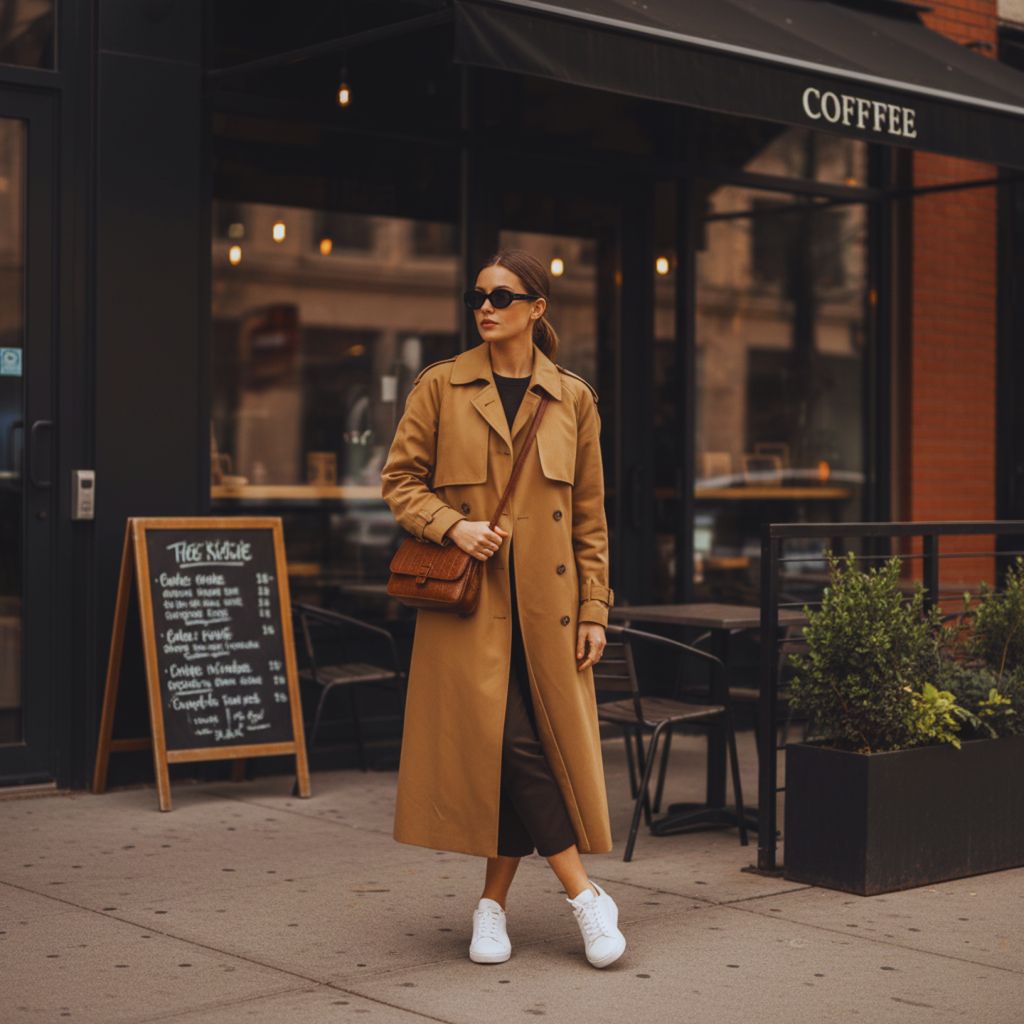
This classic pose is ideal for those moments when you’re standing still but want to add a touch of elegance and confidence. It elongates your legs and gives structure to your overall silhouette.

How to Do It:

  • Stand with one leg slightly crossed in front of the other.
  • Shift your weight onto your back foot — this gives a natural curve to your hips.
  • Relax your arms or play with your accessories (like adjusting your sunglasses or holding your bag).
  • Tilt your chin slightly downward for a powerful yet approachable vibe.

Bonus Idea:

If you’re wearing something flowy — like a trench coat, a midi dress, or wide-leg trousers — the crossed legs pose helps accentuate the fabric’s natural movement.

Why It Works:

This pose looks great in street corners, brick walls, or trendy coffee shop fronts. It’s sophisticated without trying too hard. And since it’s symmetrical yet casual, it easily draws attention when someone’s scrolling through their Pinterest feed.

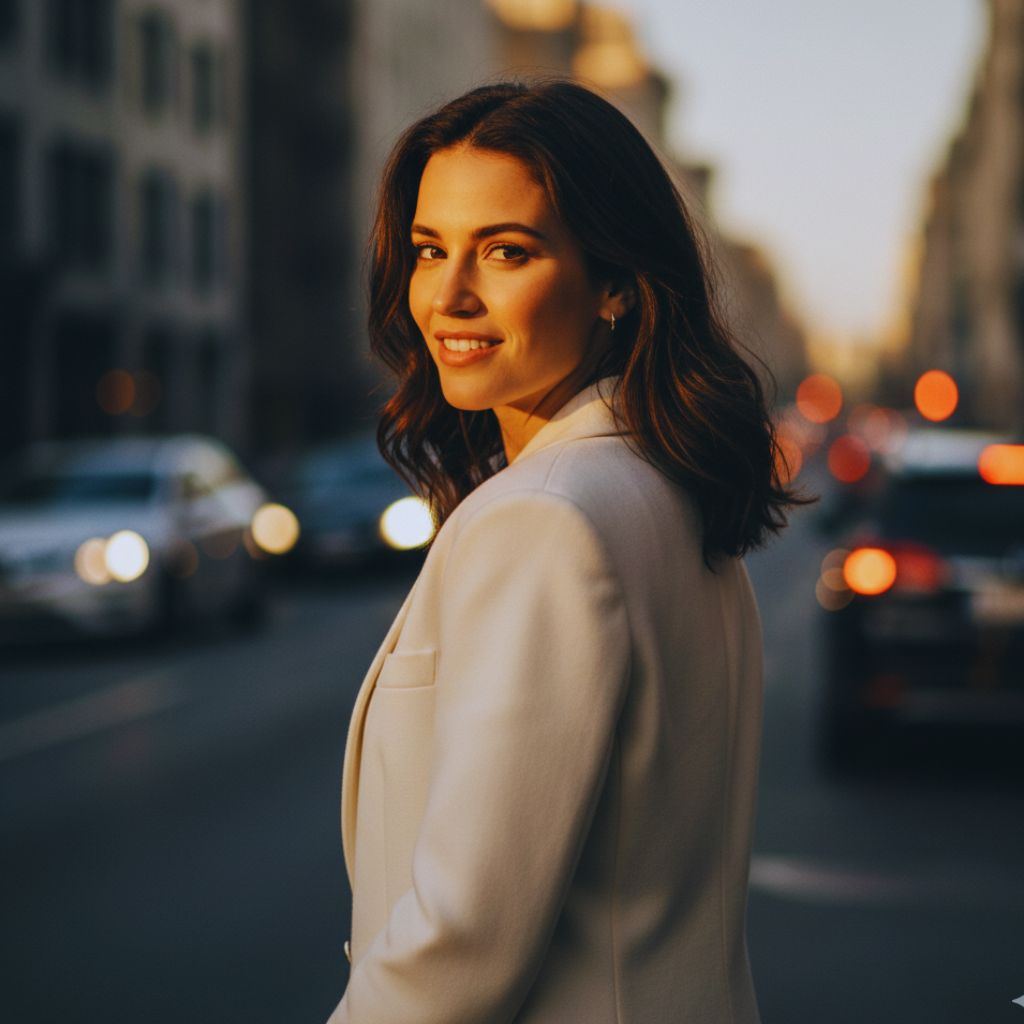
3. The “Caught Off Guard” Pose – Natural and Authentic Vibes

Woman laughing naturally in a street-style photo, holding a coffee cup with relaxed, spontaneous energy.
“Candid confidence — because the best photos are the ones that don’t look planned.”

Ever noticed how the best street-style photos look like they weren’t even planned? That’s the beauty of the “caught off guard” pose. It’s spontaneous, it’s fun, and it looks incredibly stylish when done right.

How to Master It:

  • Look away from the camera — pretend you’re laughing with a friend or checking your phone.
  • Slightly turn your shoulders away from the lens for a more candid angle.
  • Keep your expressions relaxed and natural — think of something that genuinely makes you smile.
  • Add a prop: a coffee cup, your sunglasses, or your bag. Props make candid photos look more authentic.

Pro Photographer Tip:

Have your photographer take multiple shots while you move or laugh — don’t hold still. The best candid shots often happen in between “posed” moments.

Why It Works:

Pinterest loves authenticity. Photos that look spontaneous get more engagement, because people connect with genuine energy. This pose works beautifully in urban backgrounds, street markets, or park benches — anywhere you can blend style with real-life charm.

4. The Over-the-Shoulder Look – Mystery Meets Confidence

Fashion model looking over her shoulder at the camera, wearing a stylish blazer in an urban setting.
“Master the glance — mystery, power, and poise in one effortless turn.”

The over-the-shoulder pose is timeless. It gives off that “just turned around and got caught” moment that oozes confidence, style, and intrigue.

How to Pull It Off:

  • Turn your back slightly to the camera.
  • Look over your shoulder — softly, not with a full twist.
  • Keep your chin aligned with your shoulder for a sleek angle.
  • If you’re wearing a jacket, drape it loosely off your shoulders — it adds a fashionable, editorial edge.

Best For:

This pose works wonders with structured outfits — blazers, coats, leather jackets, or even a statement dress. It highlights the back of your outfit while keeping your face in focus.

Why It Works:

It’s flirty, powerful, and effortless — all at once. The over-the-shoulder pose instantly adds personality to your street photos, making them stand out on visual platforms like Pinterest and Instagram.

5. The Sitting Pose – Relaxed Street Editorial Vibe

Stylish woman sitting on outdoor steps, wearing trendy streetwear and posing with a relaxed, editorial vibe.
“Sit back, stay stylish — street fashion made effortlessly cool.”

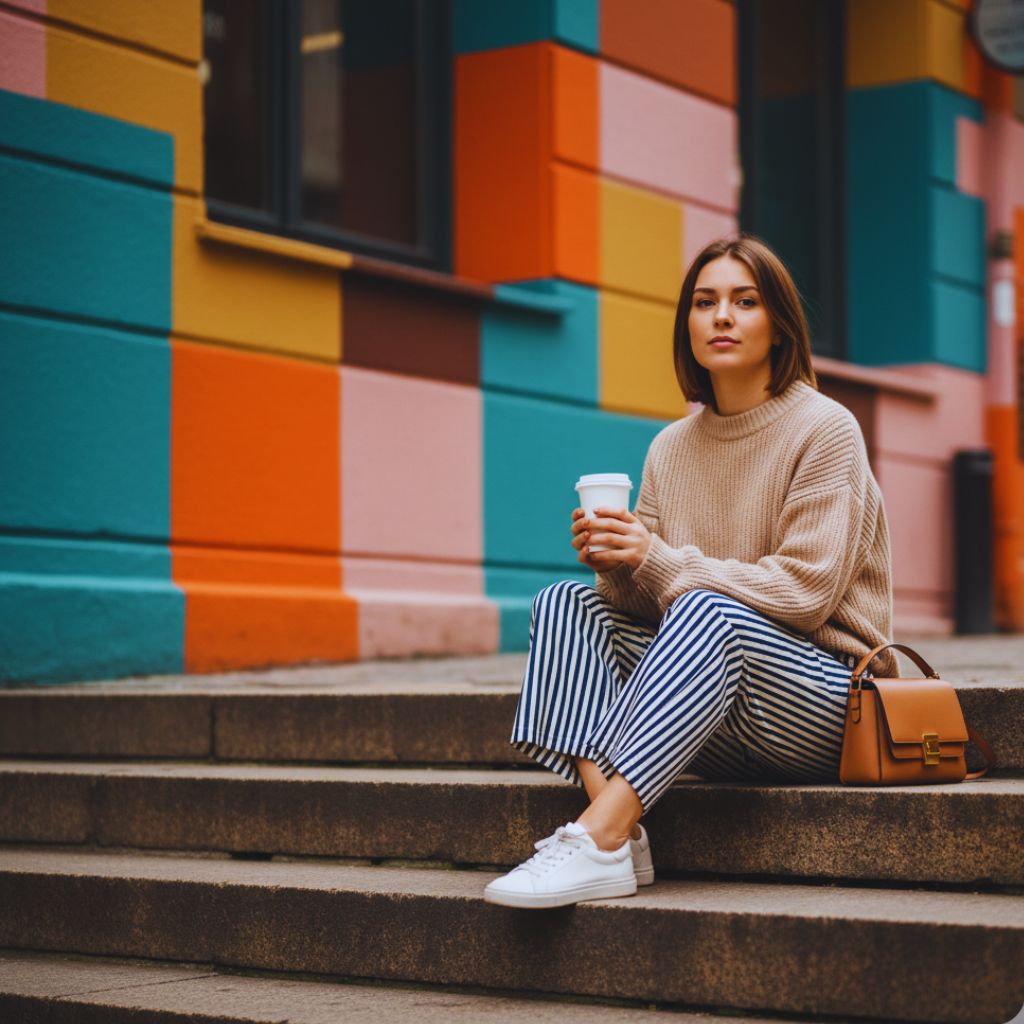
Sometimes, the best street-style photos happen when you simply sit down — on a bench, stairway, or sidewalk edge. The sitting pose brings your photo down to a relatable level while keeping it visually appealing.

How to Do It Right:

  • Sit on the edge of a step or bench, keeping your posture relaxed but upright.
  • Cross one leg over the other for structure or lean forward slightly for a candid effect.
  • Keep your hands visible — rest one on your knee, hold a drink, or play with your hair.
  • Experiment with head angles: look down, sideways, or directly into the camera.

Pro Tip:

Pay attention to the background. A colorful wall, street mural, or vintage café behind you can make the sitting pose even more eye-catching.

Why It Works:

This pose feels grounded and real — like you’re taking a moment in between your busy city day. It’s perfect for showing off streetwear, denim looks, or casual chic styles.

Final Thoughts

Getting street-style-worthy photos of yourself isn’t about expensive outfits or professional photographers — it’s about confidence, creativity, and the right poses.

These five poses — the Walking Shot, Crossed Legs Pose, Caught Off Guard, Over-the-Shoulder Look, and Sitting Pose — are proven to make your photos look elevated, effortless, and incredibly engaging.

So next time you hit the streets, remember:

  • Move with intention.
  • Find good lighting.
  • And most importantly, be yourself.

Because in the world of street style, authenticity always wins — and that’s exactly what guarantees those Pinterest re-pins and Instagram saves.

A modern living room with a beautifully arranged quote gallery wall featuring framed typography art in black, beige, and gold tones above a sofa with plants and candles.

There’s something special about a quote gallery wall — a daily visual reminder of words that inspire, comfort, and motivate you. But let’s face it… most quote walls start to look a little too Pinterest circa 2015 – overdone typography, weird spacing, and that “Live, Laugh, Love” vibe that just doesn’t fly anymore.

If you need a wall that is chic, intentional, and high, not corny and messy — you’ve come to the right place. This guide will teach you how to create a beautiful quote gallery wall with 7 layout templates, design hacks, and styling tips that will turn your space into a work of art.

Why Quote Gallery Walls Are Trending (Again)

Minimalist interiors in 2025 are colliding with personal narrative. Individuals desire spaces that express their personality — but with subtle typography art, monochromatic colors, and refined layouts.

A quote wall is the ultimate combination of art and emotion, taking your favorite quotes, fonts, and colors and turning them into something totally original. It’s also one of the cheapest and most customizable home decor projects you can undertake — particularly if you’re decorating on a shoestring budget.

The Secret to a Non-Cheesy Quote Wall

What sets an average gallery apart from a stunning one is three things:

  1. Curation – Select quotes that truly mean something to you. Not just generic inspiration.
  2. Design – Modern fonts, high-contrast color schemes, and harmonious framing.
  3. Layout –The proper layout can make even plain art resemble a designer piece.

1. The Classic Grid Layout

Minimalist grid-style quote wall with evenly spaced black frames featuring typography prints in neutral tones.
Perfect symmetry — the timeless charm of a classic grid layout.

If you’re someone who admires order and symmetry, the grid layout is where it’s at. Visualize a 3×3 or 4×4 matrix — all spacings evenly placed and precisely aligned.

How to Nail It:

  • Employ the same frames and print dimensions (8×10 or 12×12 are perfect).
  • Work with a simple color palette: black, white, beige, or softened colors.
  • Typeface balance: contrast bold serif with little sans-serifs.

2. The Mixed Media Layout

Mixed gallery wall combining quote prints, photos, and vintage art for a layered and personalized decor style.
Art meets emotion — blend quotes, memories, and moments for a lived-in look.

Who says a gallery wall has to be all quotes? Mix your typography prints with photos, art sketches, or vintage postcards. This creates a layered look that feels personal and curated, not mass-produced.

Design Formula:

  • 60% quote prints
  • 30% photos or line drawings
  • 10% decorative accents (like pressed flowers or old ticket stubs)

3. The Column Layout

Vertical column of framed quote prints beside a doorway, creating a sleek and space-saving decor layout.
Stacked sophistication — perfect for small walls and big impact.

If you’re working with limited wall space (like beside a bookshelf or door), try a vertical column layout.

How to Style It:

  • Stack 3–5 prints vertically with even spacing.
  • Use matching frames in thin black metal or natural wood.
  • Alternate between small and medium prints for visual rhythm.

This layout elongates your walls and gives your room a taller, more elegant look.

4. The Floating Frame Layout

Floating glass frames with black-and-white typography art on a minimalist textured wall.
Light, refined, and modern — floating frames for a gallery that breathes.

Looking for something really high-end? Use floating glass frames to achieve a high-end appearance. The clear borders create airiness, and your wall will feel light and open.

Design Tip:

  • Use black and white quotes for an ageless look.
  • Hang them on plain or textured walls (linen or plaster finishes are stunning).
  • Combine frame sizes to create quiet movement.

5. The Asymmetrical Gallery Layout

Asymmetrical gallery wall with mixed frame sizes and organic layout creating a creative, relaxed interior look.
Effortlessly artistic — the beauty of an intentionally imperfect gallery wall.

If you adore a slightly wonky, artsy feel — this one’s for you. Display your quote prints in loose, organic group, where no two sides reflect each other precisely.

How to Do It:

  • Begin with one anchor piece (the largest print) just off-center.
  • Add smaller quotes and photos in the surrounding area.
  • Step back frequently to tweak spacing visually rather than measuring rigidly.

This provides your wall with a lived-in, creative vibe that doesn’t look too staged.

6. Play with Color & Contrast

A cozy modern quote wall with framed typography art in black, beige, and colorful tones, combining matte and glossy finishes above a desk in a softly lit room.
Play with color and contrast — mix monochrome, neutrals, and bold hues to make your quote wall pop while keeping your space cohesive.

Your quote wall should complement your room’s palette, not clash with it.

Try these combinations:

  • Monochrome: Black text on white background for a timeless look.
  • Soft Neutrals: Beige, cream, and gold tones for warmth.
  • Bold & Bright: Vibrant typography that energizes the space.

For depth, mix matte and glossy finishes, or add one or two pops of color through art prints or frames.

7. Measure, Test & Hang

A person arranging paper cutouts on a wall to plan a quote wall layout, with a tape measure and Command strips nearby in a modern, softly lit room.
Measure, test, and hang — plan your quote wall layout on the floor or with paper templates before committing to nails for a flawless finish.

Before hammering nails, lay out your frames on the floor or tape paper cutouts to the wall. Adjust until it feels balanced.

Pro hanging tips:

  • Keep the center of your arrangement at eye level (around 57 inches).
  • Use Command strips or removable hooks for easy rearrangement.
  • Start from the middle frame and work outward.

Taking time to plan will save you from a patchwork look later.

Choosing the Right Quotes

Select words that genuinely resonate with you — something that feels personal, not performative.

Examples:

  • “Less but better.”
  • “Stay curious.”
  • “Create something timeless.”
  • “Dream in detail.”

These short, confident phrases fit beautifully in modern minimalist designs and align with the current quiet luxury trend.

Final Thoughts: Your Wall, Your Story

A quote gallery wall isn’t just decoration — it’s a reflection of your mind, your mood, and your journey. Whether you lean toward preppy minimalism, boho vintage, or dark academia, the key is to curate with purpose.

When done right, your wall becomes a daily source of motivation and peace — a blend of style and soul.

So go ahead, print those words that move you, pick your favorite layout, and start designing. Because your space deserves art that speaks — and yours will speak volumes.

Flat lay of four preppy fashion accessories: headband, mini structured bag, loafers, and classic watch, styled with coffee and books on a neutral background.

If your outfit feels almost perfect but somehow unfinished, the problem probably isn’t your clothes — it’s your accessories.

The truth? In 2025, the fashion world has officially declared that accessories make the aesthetic. Especially in the age of New Preppy fashion, where crisp minimalism meets Ivy League charm, the smallest details are what separate “cute outfit” from “effortless luxury.”

Think pearl accents, structured bags, and headbands that scream old-money polish. These pieces are flying off shelves faster than you can say “tennis-club chic.”

Let’s dive into the 4 preppy accessories everyone’s wearing right now — the ones that elevate even your simplest outfits, make your selfies look like magazine shots, and are literally selling out in seconds.

1. The Statement Headband — Old Money Meets Modern Prep

Close-up of a woman wearing a velvet or pearl headband with a white shirt, showcasing elegant preppy style.
The crown of the New Preppy era — effortless, polished, and perfectly poised.

Once a Blair Waldorf signature, the headband is officially back — and this time, it’s sleeker, bolder, and infinitely more luxurious.

Why It’s a Must-Have

The statement headband defines today’s New Preppy aesthetic. Whether it’s a velvet padded band, a pearl-embellished version, or even a satin bow design, it’s the accessory that says “I put effort into my look” without actually trying.

It frames your face, adds instant symmetry, and turns a bad hair day into a runway moment.

Style Tips

  • Pair a thick velvet headband with a crisp white shirt for that collegiate charm.
  • Choose pastel or neutral tones — beige, ivory, navy — for everyday wear.
  • For nights out, go glam with pearl- or jewel-studded bands.

Quick Styling Formula

White button-down + pleated mini + pearl headband = instant prep perfection.

Why They’re Selling Out

TikTok and Pinterest have turned the “clean preppy girl” aesthetic into the season’s hottest look — and the headband is its crown. Fashion creators can’t get enough, and restocks rarely last a week.

2. The Structured Mini Bag — Preppy Power in One Handle

Mini structured handbag in neutral tones on a marble surface with coffee and sunglasses, symbolizing preppy elegance.
Small in size, grand in statement — the mini bag defines quiet luxury.

In a world obsessed with oversized totes, the mini structured bag is making its power move. It’s the bag that whispers “old-money taste” while being practical enough for your phone, lip gloss, and keys.

Why It’s a Must-Have

The structured mini bag is the perfect finishing touch for preppy looks. It’s polished, timeless, and adds a geometric contrast to softer, feminine outfits.

It channels both Grace Kelly sophistication and Gen Z minimalism — think of it as your daily accessory version of quiet luxury.

Best Styles to Try

  • Top-handle bags: The most classic silhouette — elegant for work or brunch.
  • Mini crossbody bags: Hands-free and functional without losing the chic factor.
  • Quilted box bags: A nod to Chanel-style refinement, ideal for day-to-night transitions.

How to Style It

  • Carry it with pleated skirts and loafers for true prep-school energy.
  • Pair a camel mini bag with a navy blazer for a timeless, nautical twist.
  • Keep it clean — preppy style thrives on crisp structure and polish.

Why They’re Selling Out

Influencers are styling these bags in “quiet luxury” OOTDs, and fans are hunting them everywhere. Smaller, structured bags are the new It-girls’ secret weapon — compact, photogenic, and irresistibly chic.

3. The Classic Loafer — From Prep School to Runway

Close-up of a person wearing polished loafers and knee-high socks with a pleated skirt, evoking classic preppy style.
Step into sophistication — the loafer returns as the ultimate preppy icon.

Nothing says Preppy Revival quite like a perfect pair of loafers. In 2025, they’re not just shoes — they’re statements.

Why It’s a Must-Have

The loafer is the bridge between classic academia and modern cool. Whether you’re going for the clean girl aesthetic or Dark Academia chic, loafers ground the outfit with quiet sophistication.

They’re comfortable, gender-neutral, and incredibly versatile — you can wear them with anything from plaid skirts to wide-leg trousers.

Trending Styles

  • Chunky loafers: With lug soles and glossy leather for a bold, modern vibe.
  • Penny loafers: The original preppy icon — timeless, elegant, and minimalist.
  • Platform loafers: Add subtle height and instantly lengthen your silhouette.

How to Style Them

  • With knee-high socks and a mini skirt for prep-school charm.
  • With wide-leg trousers and an oversized sweater for a Dark Academia twist.
  • For casual days, pair loafers + jeans + crisp Oxford shirt.

Why They’re Selling Out

Fashion insiders are calling the loafer “the ballet flat of 2025.” It’s the perfect mix of comfort and structure — and that makes it the go-to shoe for Gen Z professionals and college trendsetters alike.

4. The Preppy Watch — Quiet Luxury on Your Wrist

Wrist with a classic analog watch featuring leather or gold strap, worn with a white shirt cuff in a refined preppy setting.
Time, redefined — where elegance meets effortless confidence.

In the age of smartwatches, nothing feels more sophisticated than a classic analog timepiece.

The preppy watch — sleek, minimalist, and timeless — is the ultimate symbol of quiet confidence. It doesn’t scream for attention; it simply commands respect.

Why It’s a Must-Have

A watch is not just functional; it’s emotional. It completes your look with the kind of old-school elegance that modern tech can’t replicate.

Key Design Features

  • Leather straps in tan, black, or oxblood for a polished touch.
  • Roman numerals or gold accents to match the vintage preppy mood.
  • Slim metal bands for a lighter, minimalist feel.

How to Style It

  • Wear it solo for clean sophistication.
  • Stack with delicate gold bracelets for a preppy-feminine twist.
  • Pair it with a white Oxford shirt or camel blazer — effortless chic.

Why They’re Selling Out

The return of “quiet luxury” has made traditional watches a hot accessory again. They’re not flashy — they’re powerful. And that’s exactly why Gen Z is choosing them over trendy smart devices.

Bonus: The Preppy Formula That Never Fails

Want to master the New Preppy look instantly? Just combine these elements:

Crisp White Shirt + Pleated Skirt + Loafers + Mini Bag + Headband + Classic Watch.

It’s elegant, youthful, and completely Instagram-ready. You can wear it to brunch, the office, or a study date — and still look polished without overdoing it.

Add subtle gold jewelry and a neutral blazer, and you’ve just nailed the “Gossip Girl meets Old Money” vibe everyone’s chasing in 2025.

Why Accessories Matter More Than Ever

Fashion has entered a new era — one where minimalism and refinement reign supreme. And accessories are now the key to expressing personality within simplicity.

They’re not just add-ons; they’re storytellers.

Each piece — your watch, bag, or headband — says something about your lifestyle. In the New Preppy aesthetic, these items reflect ambition, discipline, and understated confidence.

That’s why the best-dressed women of 2025 don’t wear more — they wear smarter.

Final Thoughts: Small Details, Big Impact

If your wardrobe feels stagnant, start small. You don’t need a complete closet overhaul to look fresh and current — just focus on accessories that speak volumes.

The New Preppy aesthetic is about intention. Every button, every buckle, every polished finish counts.

So whether it’s a velvet headband, a structured mini bag, a pair of glossy loafers, or a gold-accented watch, remember:

Accessories are not the afterthought — they’re the masterpiece.

And in 2025, they’re selling out fast for a reason.

“Step into the world of Gothic Castlecore — where Dark Academia meets royal romance, and antique ruby rings tell timeless stories.”

If Dark Academia met Victorian romance in a candlelit castle, the result would be Gothic Castlecore — the ultimate aesthetic for those who crave mystery, opulence, and timeless beauty.

This aesthetic is taking over Pinterest, TikTok, and Instagram because it blends everything we love — the romance of literature, the mystery of medieval halls, and the luxury of antique jewelry. Think lace, velvet, chandeliers, ruby rings, and secret libraries bathed in golden light.

In this guide, we’ll explore how to master Gothic Castlecore fashion, the must-have pieces to build the look, and how to style antique ruby rings to perfection — all while keeping things wearable, elegant, and irresistibly dramatic.

What Is Gothic Castlecore?

Gothic Castlecore is an evolution of Cottagecore and Dark Academia, combining the cozy romanticism of countryside living with the grandeur of medieval architecture and gothic elegance.

It’s about channeling old-world charm — vintage silhouettes, ornate details, and luxurious textures that look like they belong in a candlelit castle or a Shakespearean love story.

Core Aesthetic Elements:

  • Rich fabrics like velvet, lace, and brocade
  • Deep, moody colors — black, burgundy, emerald, antique gold
  • Romantic silhouettes — corsets, puffed sleeves, long skirts
  • Antique jewelryruby rings, lockets, and filigree designs
  • Atmosphere — candlelight, poetry, and gothic architecture

It’s less about dressing up and more about curating a mood — one that feels timeless, mysterious, and quietly powerful.

1. The Foundation: Dark Academia Meets Gothic Romance

Person in vintage Gothic Castlecore outfit reading by candlelight in an antique study.
“Where intellect meets romance — the Gothic Castlecore aesthetic begins with the soul of Dark Academia.”

At its heart, Gothic Castlecore is built on the bones of Dark Academia fashion — intellectual, vintage, and layered with meaning.

What Makes It Different?

While Dark Academia focuses on scholarly style — blazers, trousers, turtlenecks — Castlecore adds royalty and romance. It’s more theatrical, more luxurious, and deeply expressive.

Style Staples to Build Your Look

  • Lace blouses with ruffled collars
  • Tailored velvet blazers in dark hues
  • Long pleated skirts or flowing maxi dresses
  • Heeled boots or classic oxfords
  • Antique-inspired accessories (rings, chokers, brooches)

2. The Power of Texture: Velvet, Lace & Brocade

Assortment of velvet, lace, and brocade fabrics in dark, romantic tones with candlelight.
“Texture tells the story — velvet, lace, and brocade bring the magic of Gothic Castlecore to life.”

Texture is everything in Gothic Castlecore. It’s what gives the aesthetic its depth, richness, and otherworldly allure.

The Hero Fabrics

  • Velvet: Symbol of power and nobility — soft, dramatic, and perfect for winter.
  • Lace: Adds delicate contrast to darker tones.
  • Brocade: Embellished with regal patterns, perfect for eveningwear.
  • Satin: Gives subtle shimmer that catches candlelight beautifully.

These materials not only look luxurious but feel immersive — every texture tells a story of heritage and fantasy.

3. Antique Ruby Rings: The Heart of Gothic Elegance

Antique ruby ring on vintage book with lace gloves and dried roses.
“The ruby ring — symbol of passion, power, and timeless gothic beauty.”

No Gothic Castlecore look is complete without a ruby ring — the ultimate symbol of passion, mystery, and vintage charm.

Why Ruby Rings Are Iconic

Rubies have long been associated with royalty, love, and fire. In gothic aesthetics, they represent inner strength and timeless beauty.

What to Look For in a True Castlecore Ring

  • Deep red tones — crimson or garnet-like hues
  • Antique settings — filigree metalwork, floral engravings, or Victorian motifs
  • Gold or silver bands — aged finishes add authenticity
  • Unique imperfections — small flaws tell stories and make the piece one-of-a-kind

Styling Ideas

  • Stack your ruby ring with delicate gold bands for a romantic twist.
  • Pair it with lace cuffs or velvet gloves for a vintage feel.
  • Add a ruby pendant or garnet earrings for coordinated gothic charm.

4. Building Your Castlecore Wardrobe

Flat lay of Gothic Castlecore fashion essentials in dark, romantic colors.
“Craft your modern castle wardrobe — romantic, regal, and unapologetically gothic.”

Now, let’s translate the aesthetic into a modern, wearable wardrobe.

The Essentials

  1. Corset Tops – Structured and feminine, these instantly create the silhouette.
  2. Lace Dresses – Floor-length or midi with Victorian details.
  3. Velvet Blazers or Capes – Add richness and drama.
  4. High Boots or Mary Janes – Gothic yet practical.
  5. Antique Jewelry – Especially ruby rings, chokers, and lockets.

The Color Palette

MoodShades
RegalBurgundy, Gold, Deep Green
RomanticPlum, Wine, Antique Rose
MysteriousBlack, Charcoal, Silver

5. Where to Find Authentic Gothic Castlecore Pieces

Vintage boutique with gothic and antique clothing and jewelry displays.
“Seek the stories behind every stitch — find your treasures in vintage corners.”

To truly embody the Castlecore aesthetic, shop where the pieces feel alive with history.

Where to Look

  • Thrift and vintage stores for real antique fabrics or accessories
  • Etsy sellers offering handcrafted gothic jewelry
  • Independent boutiques specializing in historical fashion

6. Styling Tips for Modern Castlecore Queens

Stylish woman wearing Gothic Castlecore outfit blending vintage and modern pieces.
“Rule your day with quiet confidence — modern Castlecore meets daily grace.”

You don’t have to live in a castle (or read Latin poetry) to embrace this aesthetic. Here’s how to bring it into your daily life:

Everyday Styling Ideas

  • Swap your plain blazer for a velvet jacket.
  • Replace simple studs with vintage earrings.
  • Layer ruby jewelry over dark turtlenecks.
  • Mix romantic skirts with academic blouses.

7. Living the Gothic Castlecore Lifestyle

“Live your legend — surround yourself with poetry, candlelight, and timeless charm.”

Fashion is only half the charm — Castlecore is also about how you live.

To Complete the Experience

  • Decorate your space with candles, books, and vintage mirrors.
  • Listen to classical or ambient gothic playlists.
  • Write in journals, read poetry, or paint in the quiet hours.
  • Display your jewelry like artifacts — on velvet trays or vintage boxes.

It’s not just about what you wear; it’s about how you feel. Gothic Castlecore celebrates introspection, emotion, and timeless allure.

Final Thoughts: Reclaim the Romance of the Past

Gothic Castlecore is more than a fashion trend — it’s an escape into a world where art, intellect, and beauty intertwine.

Every lace cuff, every velvet sleeve, every ruby ring tells a story of mystery and strength. It’s about expressing depth in a world obsessed with simplicity.

So light a candle, put on your ruby ring, and wear your confidence like armor. The Gothic Castlecore aesthetic isn’t about pretending to be from another time — it’s about reviving the grace, romance, and rebellion that time forgot.

Because elegance never dies — it just waits for someone bold enough to wear it again.

Weekly printable planner template on a desk showing overview, priority boxes, habit tracker, and reflection sections, surrounded by pens, sticky notes, coffee, and a plant.

In a world overflowing with notifications, endless to-do lists, and digital chaos, our minds often feel like overstuffed closets — filled with good intentions but zero space to breathe.

If you’ve ever said, “I have so much to do, but I don’t know where to start,” — this one’s for you.

You don’t need another productivity app or a 50-step system. You need clarity, focus, and a simple printable planner that brings peace to your week — not pressure.

Welcome to the Only Printable Planner You’ll Ever Need for a clutter-free mind. And yes, there’s a free weekly template waiting for you inside this article!

Why Your Mind Feels Cluttered (And It’s Not Just You)

Before diving into the planner magic, let’s talk about why you’re feeling overwhelmed.

Our brains are constantly juggling — tasks, deadlines, reminders, social media, family responsibilities — and unlike computers, we can’t just “close tabs.”

Here’s what’s really happening:

  • You’re holding too many thoughts at once.
  • You have no clear system to organize them.
  • You’re constantly switching focus, draining your mental energy.

The result?
You feel busy but not productive.
You start tasks but rarely finish them.
Your brain feels like a browser with 37 tabs open — and the music is playing somewhere, but you can’t find where.

That’s where a printable planner comes in.

The Power of Putting Pen to Paper

We live in a digital age, so why go back to paper? Because science says so.

When you write things down, your brain processes them differently — you engage your memory, build stronger intentions, and relieve cognitive overload.

Here’s why a printable planner beats digital apps every time:

  • Tactile connection: Writing by hand reinforces focus.
  • Visual clarity: You see your week unfold, not just scroll through it.
  • Less screen time: Reduces digital fatigue and decision stress.
  • Mental decluttering: Frees up space for creativity and calm thinking.

Your planner becomes your external brain — a place where chaos turns into clarity.

What Makes This the Only Printable Planner You’ll Ever Need

Most planners are either too rigid or too chaotic. They come with a hundred sections you’ll never use or lack structure where it matters most.

This weekly printable planner template is different. It’s built to work with your brain, not against it.

Here’s what makes it powerful:

1. The Weekly Overview Section

Open planner showing weekly overview layout with appointments and goals, surrounded by coffee and stationery.
Weekly Overview — see your entire week at a glance to stay organized and stress-free.

See your entire week at a glance — appointments, deadlines, and goals all in one place.
This reduces anxiety because your brain no longer has to “keep track” of everything.

2. Daily Priority Boxes

Daily planner page with three priority boxes filled out, surrounded by colorful pens and motivational stickers.
Daily Priority Boxes — focus on your Top 3 tasks each day for real, balanced productivity.

Instead of endless to-do lists, you’ll have space for your Top 3 Priorities each day.
Because real productivity isn’t about doing more — it’s about doing what matters most.

3. Habit Tracker

Habit tracker journal page with checkboxes for daily routines like water, exercise, and reading.
Habit Tracker — small daily wins lead to big transformations over time.

Small habits create big transformations.
Track your progress for daily routines like water intake, workouts, meditation, or reading.

4. Notes & Reflections Section

Open reflection journal page with handwritten notes on weekly wins and improvements beside a lit candle.
Notes & Reflections — reflect weekly to stay mindful, motivated, and in control of your growth.

End your week with a quick reflection:

  • What went well?
  • What needs improvement?
  • What will I do differently next week?

This keeps you in control and aware — the key to long-term growth and a clutter-free mindset.

How to Use Your Printable Planner for Maximum Focus

Let’s turn your planner into your mental reset ritual.

Step 1: Print and Set the Scene

Print your weekly template on good-quality paper.
Grab your favorite pen, a calm corner, and maybe a cup of coffee. Make it a moment, not a chore.

Step 2: Start With a Weekly Brain Dump

Before you plan, unload everything that’s floating around your mind:
appointments, deadlines, errands, reminders, random thoughts.

Then, categorize them into:

  • Must-Do
  • Should-Do
  • Nice-to-Do

This single step can reduce your mental stress instantly.

Step 3: Set Weekly Intentions

Ask yourself:

  • What do I want to feel this week?
  • What’s the one goal that’ll make this week successful?

Write that at the top of your planner. It becomes your North Star for the week.

Step 4: Plan Each Day Intentionally

For each day, note:

  • Top 3 priorities
  • Appointments or meetings
  • Secondary tasks

Keep it simple — your brain loves clarity.

Step 5: Review Every Night

Before bed, take 5 minutes to check off tasks and move unfinished ones.
It helps you sleep better, knowing everything’s handled.

The Mental Benefits of Using a Weekly Printable Planner

When used consistently, a good planner doesn’t just organize your time — it transforms your mindset.

Here’s what regular users experience:

  • Reduced anxiety — because you always know what’s next.
  • More focus — you stop multitasking and start moving with purpose.
  • Better balance — work, home, and personal goals finally align.
  • Increased motivation — small wins feel rewarding when you see them on paper.
  • Mental clarity — your planner becomes your personal peacekeeper.

Keyword focus: printable planner benefits, mental clarity, weekly productivity planner, clutter-free mind

Why This Template Beats Expensive Planners

Flat lay of a free printable planner template with weekly overview, priority boxes, and habit tracker, surrounded by pens, laptop, coffee, and sticky notes.
Why pay $60? This free printable planner template gives you all the structure of premium planners — flexible, simple, and ready to keep your week on track.

You don’t need a $60 notebook to get your life together. This free printable planner template gives you the same structure as premium planners — without the fluff or the cost.

Here’s why people love printable planners:

  • Customizable — print as many copies as you need.
  • Portable — keep one at your desk, one in your bag.
  • Eco-friendly — print only what you’ll actually use.
  • Affordable — your mental clarity shouldn’t have a price tag.

This template was designed for real life — flexible, simple, and powerful enough to keep your week aligned.

Who Is This Printable Planner For?

This isn’t just for entrepreneurs or students.
It’s for anyone who’s tired of mental chaos and ready to live more intentionally.

It’s perfect for:

  • Freelancers juggling multiple projects.
  • Students managing classes and study time.
  • Busy parents balancing home, work, and self-care.
  • Professionals seeking structure without burnout.
  • Anyone craving mental peace in a busy world.

Because productivity shouldn’t be stressful — it should feel like alignment.

Bonus Tips to Keep Your Planner Routine Consistent

  1. Plan once a week, not every day.
    Set aside 20 minutes every Sunday to plan ahead — that’s all it takes.
  2. Keep it visible.
    Place your planner where you can see it — your desk, kitchen counter, or beside your bed.
  3. Pair it with a ritual.
    Use your planner with your morning coffee or evening wind-down routine.
  4. Celebrate progress.
    Highlight your wins, no matter how small. Progress fuels motivation.
  5. Don’t aim for perfection.
    Some weeks will go smoothly; others will be messy — and that’s okay. Your planner is a guide, not a report card.

The Takeaway

Your mind doesn’t need more apps or gadgets — it needs space to breathe.
A printable planner helps you declutter your thoughts, focus on what matters, and move through your week with calm confidence.

It’s not about doing more; it’s about feeling better while doing it.

So print your free weekly planner template, grab your pen, and start designing a life that feels clear, calm, and completely under control.

Because the secret to a clutter-free mind isn’t found in doing everything — it’s in organizing what truly matters.

Three models standing together: one in neutral tailored minimalist outfit, one in pastel soft feminine outfit, and one in street luxe cargo pants and cropped hoodie, showcasing alternatives to micro fashion trends.

TikTok is a treasure chest of fashion inspiration, but let’s be honest — not every viral outfit idea deserves a spot in your wardrobe. Some trends look incredible on influencers with professional lighting, filters, and posing, but when you try them in real life… it’s a different story.

If you’ve ever stood in front of your mirror thinking, “Why doesn’t this look as good on me as it did on TikTok?” — you’re definitely not alone. Fashion trends move fast, and sometimes, they leave us wearing things that don’t flatter our shape, skin tone, or personality.

So, let’s hit pause.
Today, we’re breaking down one major TikTok fashion trend you need to stop doing — and giving you 3 stylish, confidence-boosting alternatives that actually look good on real people.

The Trend You Need to Stop Doing: “Micro Everything”

From micro skirts to super tiny tops, the “barely there” fashion wave has dominated TikTok for months. Influencers call it “Y2K chic,” but let’s face it — not everyone can (or wants to) walk around feeling half-dressed.

The micro-trend aesthetic often includes:

  • Ultra-cropped tops barely covering the chest
  • Low-rise mini skirts
  • Shrug cardigans that don’t actually close
  • Exposed underwear (yes, that’s a thing now)

Sure, it looks daring, youthful, and attention-grabbing — but here’s the truth:
It’s not practical for most body types or lifestyles.
It often sacrifices comfort for aesthetics.
And it can easily cross from trendy to tacky if styled wrong.

Fashion should make you feel empowered, not anxious about every gust of wind.

So instead of following the micro-trend herd, let’s talk about three alternatives that give you the same stylish edge — without compromising your comfort or confidence.

Alternative #1: The Elevated Minimalist Look

Model in beige trousers, black cropped structured top, and oversized blazer with gold accessories, showcasing minimalist fashion.
Elevated Minimalist — clean lines, timeless silhouettes, and neutral tones for effortless chic.

Why It Works:

The minimalist fashion aesthetic isn’t about showing less skin — it’s about showing more style. This trend focuses on clean lines, solid colors, and timeless silhouettes that look effortlessly chic.

Think of it as the grown-up, polished version of Y2K chaos.

Key Pieces to Try:

  • Tailored trousers instead of low-rise jeans
  • Cropped but structured tops instead of bralettes
  • Oversized blazers to balance your proportions
  • Neutral tones like beige, black, white, and muted gray

Style Tips:

Play with textures — pair silk with cotton, leather with linen.
Add statement accessories — a chunky gold necklace or sleek belt can transform the outfit.
Choose quality over quantity — a few well-fitted pieces go a long way.

This alternative gives you the TikTok-worthy sophistication without looking like you tried too hard. It’s timeless, comfortable, and — bonus — incredibly flattering on all body types.

Alternative #2: The Soft Femme Revival

Model wearing pastel midi skirt, satin camisole, and light cardigan with delicate jewelry, exuding soft feminine elegance.
Soft Femme Revival — romantic, wearable pieces in pastels that flatter every shape.

Why It Works:

While the micro-trend screams “look at me,” the Soft Femme aesthetic whispers elegance. It’s all about balancing femininity and comfort — a look that flatters your shape, enhances your personality, and radiates confidence.

This style blends romantic elements with wearable cuts — think flowy skirts, fitted cardigans, and soft pastel tones.

Key Pieces to Try:

  • Midi or maxi skirts that move with you
  • Satin camisoles paired with light knits
  • Puff-sleeve blouses for a touch of vintage charm
  • Delicate jewelry that enhances, not overpowers

Style Tips:

Balance flowy bottoms with fitted tops (and vice versa).
Opt for pastel colors — blush, lilac, mint, or cream.
Play with fabrics — chiffon, satin, and soft cotton always win.

The Soft Femme Revival is ideal for anyone tired of harsh lines and revealing cuts. It’s romantic, wearable, and looks amazing both online and offline.

Alternative #3: Street Luxe — The Trendy Yet Practical Fusion

Model wearing wide-leg cargo pants, cropped hoodie, leather jacket, and sneakers in urban street setting, showcasing Street Luxe style.
Street Luxe — the perfect fusion of streetwear edge and high-fashion polish for everyday wear.

Why It Works:

If you still crave that TikTok edge, the Street Luxe trend is your sweet spot. It combines streetwear’s relaxed attitude with high-fashion polish. You get all the “cool girl” energy — without sacrificing comfort or wearability.

Think of it as the perfect middle ground between effort and ease.

Key Pieces to Try:

  • Cargo pants or wide-leg trousers (ditch the micro skirt!)
  • Cropped hoodies or structured sweatshirts
  • Statement sneakers or ankle boots
  • Layered outerwear like bomber jackets or leather coats

Style Tips:

Go for monochrome tones — all black, all white, or muted color blocks.
Layer smartly — crop tops under blazers, hoodies under coats.
Mix textures — matte, leather, denim, cotton for a high-end contrast.

Street Luxe looks great on camera and even better in real life. It’s casual, bold, and universally flattering. Plus, it aligns with the 2025 fashion movement toward comfort-driven, versatile dressing.

The Takeaway

TikTok might be dictating the latest micro trends, but real style comes from knowing what works for you.

When you let go of the urge to copy viral outfits and start curating your own look, everything changes. You’ll not only look better — you’ll feel better.

So, next time your For You Page tempts you with a “new must-try outfit idea,” ask yourself:

Does this flatter my body?
Will I feel confident wearing it in real life?
Does it align with my personal aesthetic?

If the answer is no — skip the trend and embrace one of these instead:

  1. The Elevated Minimalist Look – Timeless and classy.
  2. The Soft Femme Revival – Romantic yet wearable.
  3. Street Luxe Fusion – Cool, practical, and trend-proof.

Each of these alternatives will help you turn heads without losing comfort, class, or individuality.

Because fashion shouldn’t just be about fitting in — it’s about standing out with confidence and authenticity.

Final Thoughts

Remember: The internet will always have new fashion challenges, but your style is forever evolving. Trends fade, but confidence and authenticity never go out of fashion.

So, the next time someone says “this is the it trend,” smile, nod — and wear what makes you shine.

Laptop displaying an editable Canva ebook template, surrounded by printed mockups, sketches, and digital art tools on a creative workspace.

When I first opened my Etsy shop, I had no idea what I was doing. I loved making digital art, but the idea of turning it into income felt impossible. Fast-forward a month — and one simple ebook template changed everything.

In just 30 days, I made $1,000 in digital art sales — all from a single, repeatable product that sells while I sleep.

If you’ve been dreaming about making money from your creativity, this guide will show you exactly how to sell digital art on Etsy, step-by-step — including the ebook template strategy that turned my shop into a profitable side hustle.

Why Etsy Is the Best Place to Sell Digital Art

Etsy is more than just a handmade marketplace — it’s a goldmine for digital creators.

Unlike physical products, digital downloads are:

  • Instantly delivered (no shipping, no handling).
  • Passive — you make the product once and sell it endlessly.
  • Global — anyone in the world can buy your art instantly.
  • Low-cost — zero inventory, minimal investment.

It’s the perfect platform for artists, designers, and writers who want creative freedom and steady income.

Step 1: Understand What Sells on Etsy

Laptop displaying Etsy search results for digital printables, surrounded by sketches and color swatches.
Research what sells — check Etsy trends for printables, ebook templates, and digital art that buyers love.

Before uploading your first file, you need to know what buyers want.

The Etsy digital marketplace is booming with trends like:

  • Printable wall art
  • Planner templates
  • Digital journals and workbooks
  • Ebook templates and Canva guides
  • Clip art and design elements

Pro Tip: Go to Etsy’s search bar and type “digital art printable” or “ebook template.” Check which listings have lots of reviews — those are your clues to what’s selling right now.

When I noticed how fast ebook templates were trending, I realized — I could merge my art skills with practical design to create something people need and love.

That’s where my $1,000 month began.

Step 2: The Ebook Template Strategy (My Secret Weapon)

Editable ebook template on a laptop screen with a notebook and coffee cup on the desk.
Use the ebook template strategy — create useful digital art that solves a problem and sells passively.

Let’s talk about the product that made me $1,000 — a digital ebook template.

It wasn’t just art — it was useful art.

Here’s What I Did:

I designed a beautiful ebook layout in Canva that customers could edit for their own projects — think creators, coaches, and small business owners who want to publish a professional-looking digital book without hiring a designer.

I turned that design into a downloadable template, uploaded it to Etsy, and wrote a compelling listing description.

Within a week, sales started rolling in.

Step 3: Design a Digital Product That Sells

Designer creating high-resolution digital art on a tablet with printed mockups on a desk.
Design digital products that are beautiful and functional — make art that buyers want to use or display.

Whether you’re making an ebook template or digital print, your product should do one thing: solve a problem beautifully.

Ask Yourself:

  • What is my audience looking for?
  • How can my art make their life easier or more beautiful?
  • Would I buy this myself?

If you’re selling ebook templates, make sure they’re:

  • Easy to edit in Canva or PowerPoint.
  • Professionally styled (fonts, color palette, spacing).
  • Sized correctly for digital publishing (e.g., A4, US Letter).

If you’re selling printable art, ensure:

  • High-resolution (300 DPI).
  • Various sizes included (5×7, 8×10, A4).
  • Minimalist, trendy, or thematic designs (like boho, vintage, or modern).

Step 4: Set Up Your Etsy Shop for Success

Etsy shop dashboard on a laptop showing a branded banner, logo, and shop management interface.
Build a professional Etsy shop — strong branding, engaging bio, and clear policies attract buyers.

Your Etsy shop isn’t just a store — it’s your brand.

Here’s How to Build a Professional-Looking Shop:

  1. Choose a Memorable Name: Something that reflects your art (e.g., PixelPalace or The Art Haven).
  2. Add a Stunning Banner and Logo: Use Canva to design these in your color theme.
  3. Write an Engaging Bio: Share your story — buyers love connecting with real creators.
  4. Set Your Policies: Be clear about refunds, downloads, and usage rights.

Pro Tip: Add 10+ listings right away. The Etsy algorithm favors active shops with variety.

Step 5: Craft the Perfect Product Listing

Etsy listing for a digital ebook template displayed on a laptop, showing photos, description, and pricing.
Perfect your product listings — use high-quality mockups, detailed descriptions, and targeted keywords.

Your listing is where browsers become buyers — so make every word count.

Here’s the anatomy of a high-converting Etsy listing:

  • Title: Include strong keywords.
    Example: Minimalist Ebook Template | Editable Canva Ebook Design | Digital Art for Coaches & Creators
  • Photos: Use high-quality mockups (Canva + Smartmockups are perfect).
  • Description: Write like you’re telling a story — explain the benefits and uses.
  • Tags: Use all 13 Etsy tags with targeted keywords like:
    “ebook template,” “digital download,” “editable Canva design,” “Etsy printables,” “digital art.”
  • Price: Start low ($6–$12) to gain traction, then increase once you have reviews.

Step 6: Price Smart and Think Passive

Notebook with pricing chart for digital products next to a laptop displaying Etsy shop analytics.
Price smart — start low, adjust with reviews, and create bundles for higher passive income.

The beauty of selling digital art on Etsy is that your work keeps earning — long after you finish it.

Start by setting competitive prices, then adjust based on:

  • Product quality
  • Competitor pricing
  • Demand and reviews

Example Pricing Strategy:

ProductStarting PriceAfter 20 Sales
Simple Wall Art$5.99$9.99
Ebook Template$8.99$14.99
Digital Journal$10.99$19.99

Passive Income Tip: Create “bundles” — multiple designs sold together at a discount. Bundles often convert 2–3x more buyers.

Step 7: Optimize for Etsy SEO

Laptop screen showing Etsy SEO keyword research and tags for a digital art listing.
Optimize for Etsy SEO — use keywords naturally in titles, tags, and descriptions to boost visibility.

If your product doesn’t show up in search, it won’t sell — no matter how beautiful it is.

Here’s how to dominate Etsy SEO:

1. Use Keywords Naturally

Sprinkle keywords in your title, description, and tags without stuffing.
Example:

“This minimalist ebook template for Canva is perfect for creators looking to sell digital downloads on Etsy or self-publish their own digital art books.”

2. Write for Humans, Optimized for Search

Make sure your descriptions are engaging, readable, and benefit-driven — the algorithm notices time-on-page.

3. Update Regularly

Refresh your listings monthly — tweak keywords, change titles, or upload seasonal variations.

Step 8: Promote Your Etsy Shop Like a Pro

Workspace with phone showing TikTok, Pinterest boards, and digital art mockups for social media promotion.
Promote your shop — share your designs on TikTok, Pinterest, and social media groups for extra exposure.

Even with SEO, a little marketing magic goes a long way.

Promote on Social Media:

  • Share timelapse videos of your design process on TikTok or Instagram Reels.
  • Post mockups on Pinterest with keywords like “Digital Art Template Etsy” or “Ebook Layout for Creators.”
  • Join Facebook or Reddit groups for Etsy sellers and digital artists to gain exposure.

Step 9: Keep Improving and Expanding

Laptop showing an expanding Etsy shop product collection with notebooks and digital art files on the desk.
Keep improving — add new designs, seasonal variations, and complementary products to grow your sales.

Once your first product takes off — don’t stop!

Keep adding new designs, seasonal variations, and complementary products.

For example:

  • If your ebook template sells well, create matching social media kits or lead magnet templates.
  • If your digital wall art does well, launch collections around themes (botanical, celestial, vintage, etc.).

Each new listing expands your reach and boosts your overall visibility.

The Results: How I Hit $1,000 in a Month

I started with just one product — a Canva ebook template priced at $9.99.

By optimizing my listing, using strong keywords, and sharing my mockups on Pinterest, I made my first sale within 48 hours.

Within a month, I had:

  • 50+ sales
  • 10+ 5-star reviews
  • $1,000+ in revenue
  • 100% passive income after setup

Final Thoughts: Your Art Can Be Your Income

Selling digital art on Etsy isn’t just about creativity — it’s about building a sustainable, passive income stream from what you love.

With the right product design, ebook template strategy, and SEO optimization, you can turn your talent into consistent profit.

So open that Etsy shop, upload your first product, and remember — every bestseller starts with one bold listing.

Your art deserves to be seen.
Your time deserves to be paid.
And Etsy is waiting for your masterpiece.

Castlecore-inspired room with a medieval tapestry, brass candleholders, vintage books, and antique decor under warm candlelight.

Step inside the enchanting world of Castlecore Home Decor — a realm of velvet drapes, stone textures, candlelit corners, and ancient tapestries that whisper stories of knights and queens.

This aesthetic is taking over TikTok, Pinterest, and cozy homes everywhere — blending old-world charm with modern comfort. Whether you live in a city apartment or a countryside cottage, you can turn your home into a mini castle sanctuary without spending a fortune.

If you’ve ever dreamed of living like royalty, surrounded by medieval tapestries and vintage antiques, keep reading — this is your guide to achieving affordable Castlecore decor step by step.

What Is Castlecore Home Decor?

Castlecore is a romantic, nostalgic aesthetic that celebrates medieval, gothic, and fantasy-inspired design. Imagine stone walls, dark wood furniture, gilded mirrors, and tapestries depicting mythical scenes — all wrapped in warm, candlelit coziness.

It’s a style that blends the elegance of a castle with the comfort of a modern home.

Key Castlecore Elements:

  • Rich fabrics: Velvet, brocade, and damask.
  • Earthy tones: Deep greens, burgundy, gold, and aged bronze.
  • Ornate decor: Antique mirrors, candelabras, and iron accents.
  • Medieval artwork: Tapestries, coat-of-arms, and stained glass.
  • Natural touches: Dried flowers, stone vases, and wooden chests.

This aesthetic is both luxurious and cozy, blending fantasy and history with modern practicality.

How to Start Decorating in Castlecore Style (Without Breaking the Bank)

Castlecore might look lavish, but it doesn’t have to cost a king’s ransom. With a few smart decor tricks and budget finds, you can capture the medieval aesthetic in your home affordably.

Here’s your step-by-step Castlecore decorating guide:

1. Start with a Royal Color Palette

Castlecore living room with burgundy walls, velvet curtains, and warm golden lighting creating an old-world ambiance.
Begin with a royal color palette — deep, rich tones like burgundy, forest green, or navy set the Castlecore mood.

Color sets the mood for your medieval-inspired haven.

Choose deep, rich tones that evoke a sense of old-world luxury and warmth.

Castlecore Color Palette Ideas:

  • Burgundy & Gold — for regal richness.
  • Forest Green & Bronze — for an earthy, enchanted vibe.
  • Deep Navy & Silver — for a royal gothic touch.
  • Cream & Wood Brown — for a soft medieval cottage look.

Tip: Paint one accent wall in a deep shade (like wine red or moss green) to create drama without overwhelming your space.

2. Find Budget-Friendly Medieval Tapestries

Medieval-style tapestry with floral and heraldic designs hanging on a wall in a cozy vintage room.
Add affordable “medieval” tapestries — thrift fabric panels or replica weaves to tell a timeless story.

No Castlecore home decor is complete without tapestries — those beautifully woven wall hangings that tell stories of myth, nature, and history.

But here’s the secret: you don’t have to buy real antiques to get the look.

Where to Find Affordable Tapestries:

  • Thrift stores often have vintage fabric panels or curtains that mimic medieval art.
  • Online marketplaces offer replica medieval tapestries under $20–$40.
  • Fabric stores sometimes sell baroque upholstery fabric you can stretch on a frame for a DIY tapestry look.

Choose designs with:

  • Floral borders
  • Hunting or medieval scenes
  • Celtic patterns
  • Heraldic emblems

Hang them with antique-style rods or tassel cords for that authentic castle wall effect.

3. Add Antique Accents (for Less)

Shelf styled with brass candlesticks, vintage books, and antique picture frames in warm Castlecore decor.
Decorate with affordable antique accents — think brass candlesticks, old books, and ornate frames.

True Castlecore charm lies in the details — those aged, intricate accents that make a space feel timeless.

But here’s where the magic happens: you can find budget antiques that look centuries old without spending a fortune.

Budget Antique Ideas:

  • Vintage candleholders or brass candlesticks — add instant gothic warmth.
  • Old books with leather bindings — stack them on a wooden chest or shelf.
  • Ornate picture frames — perfect for portraits or mirrors.
  • Iron keys, goblets, or clockwork trinkets — small details, huge impact.

Pro Tip: Visit flea markets or estate sales on weekends — they’re goldmines for Castlecore decor on a budget.

4. Incorporate Texture — The Soul of Castlecore

Castlecore interior with velvet throws, layered rugs, and soft lighting highlighting rustic wood and brass textures.
Layer textures — velvet, linen, wood, and brass bring that rich, lived-in medieval charm.

Modern homes often feel too sleek for this style. The secret to authentic Castlecore interiors lies in layered texture.

Think stone, wood, and fabric — all aged to perfection.

Ways to Add Texture:

  • Drape velvet throws over armchairs or bed frames.
  • Use linen or embroidered curtains instead of blinds.
  • Add rug layers — a Persian rug over a jute mat adds depth.
  • Mix brass, wrought iron, and distressed wood in furniture and decor.

Texture makes your space feel ancient yet alive — like a cozy, candlelit chamber in a storybook castle.

5. Light Like a Medieval Hall

Lighting sets the tone — literally. Replace harsh modern lighting with soft, ambient warmth.

Lighting Ideas:

  • Use candles and lanterns for a moody glow.
  • Choose chandelier-style lights with vintage bulbs.
  • Add wall sconces with faux candle flicker for authenticity.
  • Swap cool white bulbs for amber-toned ones to mimic candlelight.

Pro Tip: Layer lighting — use table lamps, candles, and fairy lights together to build an inviting atmosphere.

6. Furniture Fit for a Castle

Castlecore living space with dark wood furniture, brass accents, and an antique trunk as a coffee table.
Choose budget-friendly furniture — dark wood, chalk paint finishes, and brass details create old-world elegance.

You don’t need heavy antique furniture — just pieces that feel old-world.

Budget-Friendly Furniture Tips:

  • Look for dark wood finishes in thrift stores.
  • Repaint modern furniture with chalk paint in aged tones.
  • Add brass handles or ornate knobs for an antique look.
  • Repurpose old trunks as coffee tables or storage benches.

Simple changes can transform modern furniture into medieval treasures with minimal cost.

7. Accessorize with Storytelling Details

Castlecore desk decorated with old maps, scrolls, crystal balls, and dried herbs for a magical, storybook vibe.
Accessorize with storytelling details — maps, crystals, and relics make your space feel like a real-life fairytale.

Castlecore thrives on narrative and symbolism — every object should feel like it holds a story.

Decor Ideas That Add Story:

  • Display maps, scrolls, or calligraphy prints.
  • Add crystal balls, hourglasses, or antique mirrors.
  • Showcase herbal jars or dried flowers for a witchy cottagecore twist.
  • Hang wrought iron keys or small shields as wall accents.

These touches make your home feel personal, mysterious, and magical — just like a castle should.

Where to Find Budget-Friendly Castlecore Decor

If you know where to look, Castlecore doesn’t have to be costly. You just need a bit of imagination and a good eye for details.

Best Places to Shop for Affordable Medieval Decor:

  • Thrift stores — for old furniture, mirrors, and candleholders.
  • Facebook Marketplace — for vintage trunks, chests, and armchairs.
  • Flea markets & estate sales — for authentic antique accents.
  • Online marketplaces — search for “medieval wall art,” “castle decor,” or “gothic antiques.”

Pro Tip: Mix real vintage finds with replica pieces to balance authenticity and budget.

Castlecore DIY Ideas (For the Creative Royal in You)

Why buy when you can craft?

Here are a few DIY Castlecore ideas to personalize your decor even more:

  • DIY faux tapestry: Stretch patterned fabric over canvas and frame it.
  • Aged candles: Drip wax from one candle over another for that old-world effect.
  • Distressed furniture: Use sandpaper and dark wax to give wood pieces a vintage patina.
  • Potion bottles: Fill old glass bottles with colored water and label them with medieval-style tags.

Affordable, fun, and 100% Castlecore-approved.

Final Thoughts: Live Like Royalty (Without Spending Like It)

Castlecore Home Decor is more than an aesthetic — it’s an atmosphere. It’s about bringing romance, history, and a touch of fantasy into everyday life.

By choosing budget-friendly medieval tapestries, vintage antiques, and rich textures, you can create a home that feels timeless — warm, mysterious, and uniquely yours.

So light those candles, hang your tapestries, and let your imagination reign.
Your home doesn’t need to be a castle — but with Castlecore, it’ll feel like one.

DIY textured wall art made with spackle paste on canvas in neutral tones, styled in a modern minimalist room with painting tools and materials.

If you’ve been scrolling through TikTok or Pinterest lately, you’ve probably seen this gorgeous and budget-friendly trend blowing up — the Viral DIY Wall Art Technique that costs less than $10 and completely transforms your space.

It’s minimalist, renter-friendly, and incredibly easy to make — no artistic background required! Whether you’re decorating your first apartment, a rented home, or just refreshing your room on a tight budget, this trend is your golden ticket to a stylish interior without breaking the bank.

Let’s dive into how you can recreate this viral DIY wall art step-by-step and make your walls look like they belong in a modern design magazine.

Why Everyone’s Obsessed with This Viral DIY Wall Art Trend

The beauty of this under $10 wall art idea lies in three magic words: affordable, aesthetic, and effortless.

Unlike pricey framed prints or wallpaper, this project lets you make custom wall decor using simple items you already have — like cardboard, canvas, or even old packaging materials.

What Makes It So Popular:

  • Renter-Friendly: No drilling, nailing, or wall damage.
  • Budget-Friendly: Total cost under $10 — sometimes even free if you reuse materials.
  • Highly Customizable: Choose your favorite colors, textures, and patterns.
  • On-Trend Aesthetic: Fits the viral minimalist, wabi-sabi, and neutral-toned home styles.
  • Quick and Fun: You can complete one piece in under an hour.

In short, this trend proves that you don’t need a big budget to have Pinterest-worthy decor — just creativity and a few clever materials.

Supplies You’ll Need (All Under $10!)

Before we start, gather these simple supplies. You might already have most of them lying around!

Basic Materials:

  • A canvas, foam board, or cardboard base
  • Spackle or lightweight wall putty (for texture)
  • A butter knife, paint scraper, or old spoon
  • Acrylic paint in your favorite tones (white, beige, cream, or pastels)
  • Paintbrush or sponge
  • Optional: Gold or metallic accent paint for a luxury finish

Step-by-Step Guide: How to Make This Viral $10 Wall Art

Here’s the fun part — creating your masterpiece! This is the same DIY textured art technique that’s trending across social media right now.

Step 1: Prepare Your Canvas

DIY art setup showing blank canvas, foam board, and photo frame ready for texture application.
Prepare your canvas — reuse cardboard, foam board, or an old photo frame as your art base!

Start with a clean, smooth surface. If you’re using cardboard, cut it to the size you want. If it’s a foam board, wipe it down gently.

You can even reuse old photo frames by removing the glass and using the backing board as your base!

Step 2: Apply Texture (The Game-Changer)

Hands applying wall putty to a board, forming textured swirls for DIY wall art.
Apply texture — use spackle or wall putty to create swirls, streaks, or abstract peaks for a 3D effect.

This is what makes your artwork look high-end. Use spackle or lightweight wall putty to create a 3D textured effect.

Spread it across your surface with a butter knife or scraper — don’t aim for perfection! The beauty of this style lies in imperfection and organic texture.

You can make:

  • Swirls for a fluid, wave-like design.
  • Diagonal streaks for a modern look.
  • Abstract peaks and valleys for a sculptural, minimalist vibe.

Let it dry for about 1–2 hours (or until firm to touch).

Step 3: Paint It to Perfection

DIY artist painting over textured wall art with neutral beige and terracotta tones.
Paint your masterpiece — choose calming neutrals or bold earth tones to bring your texture to life.

Once dry, it’s time to paint your masterpiece.

Choose neutral tones for a calming aesthetic or go bold with terracotta, navy, or olive green for a statement piece.

Use a paintbrush or sponge and gently glide color across the texture — this will highlight the raised details and create depth.

Color Ideas:

  • Minimalist Neutral: Beige, ivory, and soft tan.
  • Earthy Modern: Clay, burnt orange, and sage.
  • Luxury Glam: White base with gold or metallic accents.

Optional: Add a few strokes of metallic gold or bronze paint to mimic the expensive “gallery wall art” look.

Step 4: Let It Dry and Frame It (Optional)

Textured wall art drying beside a gold frame and art supplies on a tabletop.
Let it dry and frame — thrift a frame, mount it, or lean it for an effortless designer look.

Once painted, let your piece fully dry for a few hours.

Now you can either:

  • Frame it in a thrifted or dollar-store frame.
  • Mount it using double-sided command strips.
  • Or simply lean it against the wall for a chic, effortless style.

Renter-Friendly Tip: Use removable adhesive hooks or Velcro strips to hang your art without damaging walls.

Step 5: Style It Like a Designer

Modern living room styled with handmade textured wall art above a neutral-toned sofa.
Style it — display your $10 masterpiece as a chic focal point or part of a stylish gallery wall.

Your wall art is ready — now it’s all about placement!

Here are a few styling ideas to make your room look instantly elevated:

  • Hang it above your bed, sofa, or desk as a focal point.
  • Create a mini gallery wall with different sizes and shapes.
  • Pair it with candles, vases, and neutral décor pieces for a cozy aesthetic.

Remember, the trick is in layering textures and keeping your color palette cohesive.

Creative Variations to Try

Want to make your art even more unique? Try these DIY wall art variations that use the same under-$10 method:

1. Dual-Tone Art

Two-tone DIY wall art with beige and olive green halves, featuring textured spackle on one side.
Split your canvas into two colors and texture just one half for a bold, modern contrast.

Apply one color on half the canvas and a complementary tone on the other half. Add texture only to one side for contrast.

2. Raised Line Art

DIY raised line art showing abstract white-on-white 3D patterns created with hot glue and paint.
Draw flowing shapes with hot glue, then paint over for stunning minimalist 3D art.

Use hot glue to draw abstract lines before applying putty and paint over it — it creates a stunning 3D line art effect.

3. Nature-Inspired Prints

DIY wall art with leaf and flower imprints pressed into textured white putty for a natural aesthetic.
Press dried leaves or flowers into the putty for a naturally beautiful, earthy design.

Press dried leaves, flowers, or twigs into the putty before it dries for a natural, organic texture.

4. Gold Leaf Magic

DIY textured wall art featuring gold leaf accents on raised areas for an elegant metallic finish.
Add gold leaf to textured highlights for that boutique, gallery-worthy shimmer.

For an upscale vibe, gently press gold leaf sheets on raised areas once the paint is tacky. It gives that “boutique gallery” touch.

Each version stays affordable, fun, and incredibly chic — proving creativity always beats cost!

Why This DIY Wall Art Is Perfect for Renters

Renters often struggle to decorate without damaging walls — and this trend solves that beautifully.

Here’s why it’s a renter’s dream project:

  • No nails or screws needed — use removable strips.
  • Lightweight materials mean no wall damage.
  • Totally customizable — repaint, retexture, or move it anytime.
  • Easily replaceable or upgradable when you change your decor.

It’s the perfect way to make your space feel personal and stylish without violating your lease or spending much.

Budget Breakdown: How It Stays Under $10

Here’s a quick look at how affordable this project really is:

ItemCost
Canvas or cardboard base$2–$3
Spackle or wall putty$3
Acrylic paint$2–$3
Tools (reuse household items)Free

Total: Around $8–$9, depending on what you already have.

You can even make multiple mini art pieces with the same supplies — creating an entire gallery wall for under $20!

Final Thoughts: Creativity Over Cost

The best thing about this viral DIY wall art technique isn’t just its price — it’s the joy of creating something with your own hands. Every stroke, texture, and color tells your story.

You don’t need to be an artist or spend hundreds of dollars to have a beautiful home. You just need creativity, a few simple tools, and a willingness to experiment.

So next time you want to refresh your space, skip the overpriced art prints — grab some spackle, paint, and imagination instead.

Pinterest collage of 5 vintage watches styled in minimalist aesthetic.

If you’ve scrolled through Instagram or TikTok recently, you’ve likely seen it — that flash of metal on a non-Apple Watch wrist. Gen Z has a new fashion obsession: vintage watches.

And it’s not about grandpa’s old dusty watch anymore — it’s about character, craftsmanship, and understated luxury. These watches speak for themselves, don’t shout. They say, “I know style, and I don’t need to shout.”

The great news? You don’t need to spend thousands to get on board. You can purchase real, fashion-forward vintage watches for under $500 that instantly elevate your style — if your style is minimalist, streetwear, or old-money cool.

Let’s take a look at the 5 vintage watches Gen Z loves — and how each of them can totally transform the way you style your wrist.

1. The Classic Casio A168 — Retro Cool Meets Everyday Flex

Retro Casio A168 vintage digital watch styled with 2000s-inspired accessories.
The Y2K timepiece that started it all — nostalgic, iconic, and under $50.

If there’s one watch that perfectly captures Gen Z’s nostalgia-core energy, it’s the Casio A168. This watch screams Y2K in the best way possible — with its square digital face, stainless-steel band, and subtle futuristic glow.

Why It’s a Must-Have

  • Affordable Icon: At around $50, it’s one of the most budget-friendly entry points into vintage watch style.
  • Gender-Neutral Appeal: It looks equally sleek on men and women.
  • Y2K Aesthetic: Perfect for those who live for that early-2000s Tumblr-meets-modern vibe.

Style It Like This

  • Pair it with baggy jeans, a crop top, and a bomber jacket for streetwear perfection.
  • Or go classic: white shirt, tailored trousers, and sneakers for a “quiet luxury” look.

Why Gen Z Loves It

It’s cool, nostalgic, and unarguably ironic. Casio digital watches are the new “retro flex” — evidence that great design never goes out of style.

2. Timex Marlin Mechanical — Old Money Vibes, Contemporary Price

Timex Marlin mechanical vintage dress watch on leather strap.
Modern luxury with a mid-century soul — meet the Timex Marlin.

For those who adore the sophistication of mid-century design, the Timex Marlin is a choice that can’t be beaten. Drawing inspiration from dress watches in the 1960s, it’s minimalist, sophisticated, and deceptively vintage.

Why It’s a Must-Have

  • Mechanical Movement: Hand-wound like old-school watches from the past — no batteries required.
  • Elegant Simplicity: Simple dial, slender hands, and a domed crystal that exudes sophistication.
  • Affordable Luxury: Typically under $200.

Style It Like This

  • Layer with gold bracelets for a soft-luxury look.
  • Ideal accessory for linen shirts, leather loafers, and neutral-hued outfits.

Why Gen Z Loves It

It’s the “old money” look without the old money cost. It appears like something you’d inherit — even if you’ve simply purchased it online.

3. Seiko 5 Automatic — The Cult-Favorite Mechanical Watch

Seiko 5 automatic watch styled with smart-casual outfit for Gen Z aesthetic.
The cult favorite that bridges craftsmanship and cool.

Should there be one name spoken in hushed tones among vintage watch enthusiasts, it’s Seiko. The Seiko 5 Automatic is a legend — durable, chic, and loaded with personality.

Why It’s a Must-Have

  • Automatic Movement: It winds itself while you move — mechanical art for your wrist.
  • Durability: Built like a tank; they’re said watches are known to last decades.
  • Design Variety: From traditional silver to statement navy dials, there’s one for every mood.

Style It Like This

  • For an academia look, wear it with a brown leather strap and a tweed blazer.
  • Want edge now? Wear stainless steel with an all-black ensemble.

Why Gen Z Loves It

It’s not a watch, it’s a badge of honor for genuine craftsmanship. Wearing a Seiko is like being part of a secret society of individuals who value true design for its own sake, not just because it’s trendy.

4. Swatch Irony Chrono — Pop-Art Meets Precision

Colorful Swatch Irony Chrono vintage watch styled with 90s pop art background.
When art meets function — the Swatch Irony Chrono is unapologetically fun.

Swatch has consistently aced the balance of fun and fashion — and their Irony Chrono range brings that to retro perfection. The watches are playful and mature, sporty and sophisticated.

Why It’s a Must-Have

  • Swiss Made: Quality meets creativity.
  • Eye-Catching Design: Bold colors, big dials, and a very 90s vibe.
  • Affordable: Usually below $150, depending on the edition.

Style It Like This

  • Wear with graphic tees, cargo pants, and vintage sneakers for a 90s revival style.
  • Or pair it with a crisp blazer to give personality to formal outfits.

Why Gen Z Loves It

Swatch embodies artsy individuality. These watches aren’t about luxury branding — they’re about self-expression. Every model is like wearable pop art.

5. Citizen Vintage Eco-Drive — Affordable Luxury That’s Sustainable

Citizen Eco-Drive vintage solar-powered watch in minimalist aesthetic setup.
Luxury powered by light — sustainability has never looked so timeless.

The last must-have? The Citizen Eco-Drive vintage collection — forever style fueled by light. It’s sustainable, refined, and absolutely Gen Z-approved.

Why It’s a Must-Have

  • Solar-Powered: Powered by any light — no need for battery replacements.
  • Classic Aesthetic: Clean dials, gold accents, and streamlined silhouettes.
  • Built to Last: Citizen’s longevity is the stuff of legend.

Style It Like This

  • Try it with a denim jacket and a white tee for effortless cool.
  • Or commit to full clean girl / guy vibe — neat ensemble, minimal accessories, statement watch.

Why Gen Z Loves It

Because sustainability is fashion. Eco-Drive line embodies what this generation loves most: environmentally friendly design that looks effortlessly luxe.

Why Vintage Watches Are the Ultimate Style Upgrade

Gen Z has taught us one thing: authenticity beats brand hype.

Vintage watches encapsulate that — they contain history, texture, and classic beauty.

The Real Appeal:

  • Sustainable Fashion: Recycling and bringing back old styles appeals to the eco-friendly attitude.
  • Individuality: No two vintage watches age alike — each writes your narrative.
  • Quiet Luxury: You do not have to show off a Rolex when your $200 Seiko demonstrates you have good taste.

Bonus Tip:

Blend and combine metal colors. Layer gold, silver, and bronze for that put-together, collector vibe.

Pro Styling Formula: How to Make Any Outfit Look Like It’s Worth a Fortune

Need to achieve that bohemian-rich vibe on a student budget? Here’s the trick:

Neutral ensemble (black, white, beige) + vintage watch + understated jewelry + sleek shoes = ageless perfection.

The secret is to make your watch the statement. It’s not about screaming fits — it’s about quiet refinement.

Why This Trend Won’t Be Fading Away

Vintage watches are not a temporary TikTok trend. They’re the building blocks of the contemporary classic look — ageless, gender-neutral, and infinitely versatile.

Whether you’re a minimalist, an artist, or a sneakerhead, a vintage watch fits your vibe. It’s your anchor piece — grounding your look with effortless confidence.

Gen Z isn’t collecting watches to flex wealth. They’re curating meaning. Each timepiece feels like an extension of personality — nostalgic, real, and undeniably cool.

Final Thoughts

The surge in vintage watches priced less than $500 confirms one thing: amazing style need not be pricey.

From the retro Casio A168 to the elegant Timex Marlin, each of these watches adds history, personality, and instant elegance to your wrist.

So next time you’re about to purchase another trendy gadget, ask yourself — do you really want something throwaway, or something with a story behind it whenever you glance at the time?

Since Gen Z’s love for retro watches is not about keeping up with trends.
It’s about redefining it — piece by piece, forever and always.